16. APPENDICES
| Appendices | |
| Appendix A | Decision flow chart on indwelling catheterisation |
| Appendix B | Male urethral catheterisation – insertion procedure |
| Appendix C | Female urethral catheterisation – insertion procedure |
| Appendix D | Insertion of a suprapubic balloon catheter |
| Appendix E | Patient information about common problems with indwelling catheter equipment |
| Appendix F | Observation of urinary drainage |
| Appendix G | Possible colourand odour changes in urine dueto food or medication |
| Appendix H | Preparation and procedure for changing a suprapubic catheter |
| Appendix I | Removal of an indwelling urethral catheter – protocol |
| Appendix J | Removal of a urethral catheter – procedure |
| Appendix K | Removal of a suprapubic catheter – procedure |
| Appendix L | Troubleshooting for indwelling catheters (problem management) |
| Appendix M | Potential problems during catheter removal |
| Appendix N | Potential problems following catheter removal |
| Appendix O | Bladder washout– procedure and troubleshooting |
| Appendix P | Obtaining urinesample from an indwelling catheter – procedure |
| Appendix Q | Catheter changerecord - example |
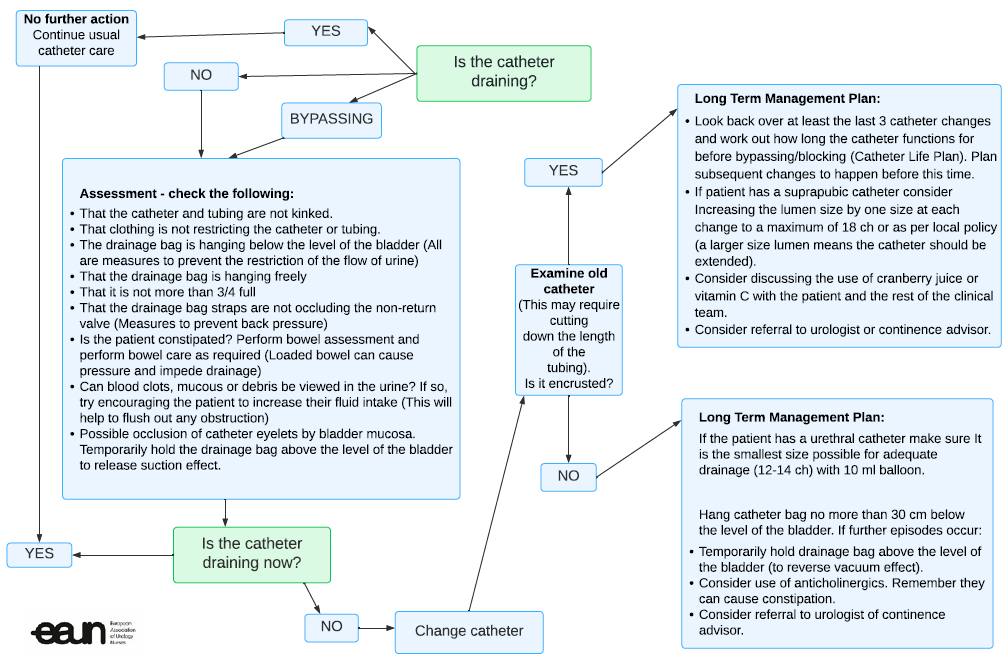
| Appendix R | Catheter drainage - decision flow chart |
| Appendix S | PICO questions |
| Appendix T | Quality improvement projects |
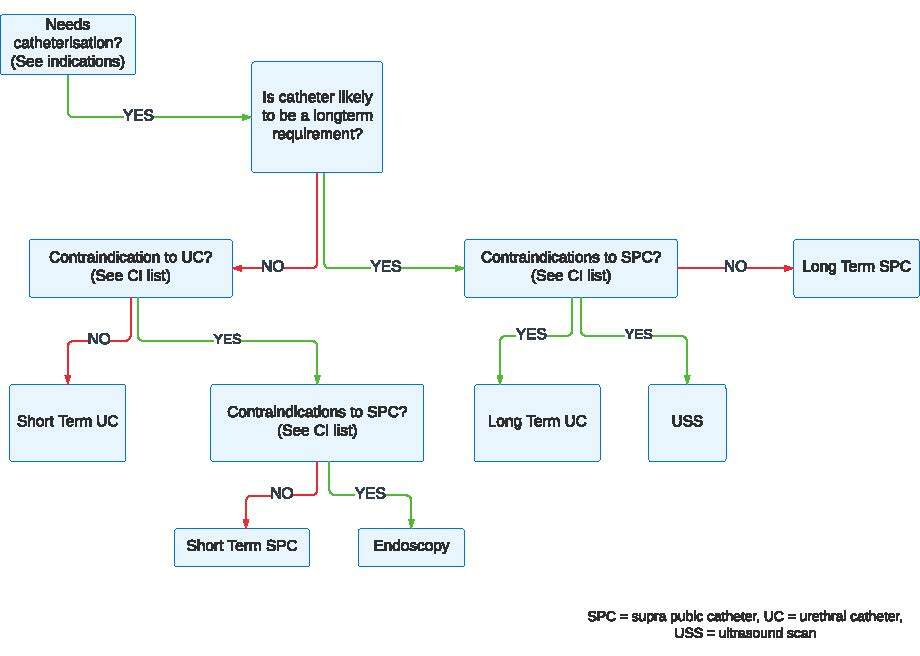
Appendix A
Decision flow chart on indwelling catheterisation
Appendix B
Male urethral catheterisation – insertion procedure
Checklist equipment:
- Sterile catheterisation pack containing specimen containers, kidney shaped dish, low-linting swabs, and disposable towels
- Disposable pad for bed protection
- 2 pairs of gloves; one of which must be sterile for handling catheter
- Selection of appropriate catheters; it is advisable to take a spare catheter in addition to the one you want, and one of a different/smaller size
- Sterile anaesthetic lubricating jelly (1 or 2 tubes)
- Universal specimen container, if required
- Cleansing solution
- Bactericidal alcohol hand disinfectant
- 10 ml sterile water (for inflation of balloon), or as recommended by manufacturer
- Syringe and needle to draw up sterile water and inflate balloon
- Disposable plastic apron/protective clothing
- A closed urinary drainage system, e.g., a night bag, leg bag or catheter valve
- A catheter drainage bag stand, if required
| Action | Rationale |
| 1. Check patient file for past problems and allergies etc. | To ensure the patient understands the procedure |
| 2. During the procedure, explain the process to the patient | Consent |
3 a) Undertake procedure on the patient’s bed or in clinical treatment area using screens/ curtains b) Assist the patient to get into the supine position to ensure the penis is accessible c) Do not expose the patient at this stage of the procedure | To ensure patient’s privacy To maintain patient’s dignity and comfort |
| 4. Wash hands using soap and water or bactericidal alcohol hand rub | To reduce risk of infection |
| 5. Clean and prepare the trolley, placing all equipment required on the bottom shelf | Top shelf acts as a clean working surface |
| 6. Take the trolley to the patient’s bedside | |
| 7. Open the outer cover of the catheterisation pack and slide the pack onto the top shelf of the trolley | To prepare equipment |
| 8. Using aseptic technique, connect the bag to the catheter | To reduce the risk of cross-infection |
| 9. Remove cover that is maintaining the patient’s privacy and position a disposable pad under the patient’s buttocks and thighs | To ensure urine does not leak onto the bed |
| 10. Clean hands with a bactericidal alcohol hand rub | Hands may have become contaminated by handling the outer packs |
| 11. Put on gloves | To reduce risk of cross-infection |
| 12. Place dressing/protective towel across the patient’s thighs and under penis | To create a protective field |
| 13. Lift the penis and retract the foreskin if present using a gauze swab and clean the glans penis with the solution. Beginning with the foreskin, the glans and urethral meatus at the end. Use a new swab for each part. | Lifting the penis straightens the penile urethra and facilitates catheterisation. To reduce the risk of introducing infection. [237] |
| 14. Replace existing gloves with a sterile pair | To prevent infection |
| 15. Slowly instil 10–15 ml of the (anaesthetic) lubricating gel into the urethra holding the penis firmly below the glans with thumb and fingers and the tip of the syringe firmly in the meatus to prevent the gel from leaking out | Adequate lubrication helps to prevent urethral trauma. Use of a local anaesthetic minimises the discomfort experienced by the patient and can aid success of the procedure. |
| 16. Remove the syringe tip from the urethra and keep the urethra closed. Alternatively, a penile clamp may be used. | To ensure that the gel stays in the urethra |
| 17. Wait as recommended on the product (3–5 min) | To ensure a maximised anaesthetic effect [69, 77, 78, 81] |
| 18. Advance the catheter gently to the bifurcation. Hold the penis all the time upright with traction of the other hand (if no urine drains gently apply pressure over the symphysis pubis area. | Advancing the catheter ensures that it is correctly positioned in the bladder [85, 238, 239] |
| 19. Slowly inflate the balloon according to the manufacturer’s direction, having ensured that the catheter is draining urine beforehand | Inadvertent inflation of the balloon in the urethra causes pain and urethral trauma [67, 238] |
| 20. Withdraw the catheter slightly | Withdrawing the catheter ensures the balloon sits at the bladder base ensuring optimal urine drainage |
| 21. Secure the catheter using a support strap. Ensure that the catheter does not become taut when the patient is mobilising or when the penis becomes erect. (for stabilisation of urethral catheter, see 6.5.3.2) | To maintain patient comfort and to reduce the risk of urethral and bladder neck trauma |
| 22. Ensure that the glans penis is cleansed after the procedure and reposition the foreskin if present | Retraction and constriction of the foreskin behind the glans penis; paraphimosis may occur if this is not done [69] |
| 23. Help the patient into a comfortable position. Ensure that the patient’s skin and the bed are both dry. | If the area is left wet or moist, secondary infection and skin irritation may occur |
| 24. Measure the amount of urine | To be aware of bladder capacity for patients with previous occurrences of urinary retention. To monitor renal function and fluid balance. It is not necessary to measure the amount of urine if the patient is having the urinary catheter routinely changed. |
| 25. Take a urine specimen for laboratory examination, if required | To rule out urinary tract infection |
| 26. Dispose of equipment in a plastic clinical waste bag and seal the bag before moving the trolley | To prevent environmental contamination |
| 27. Record information in relevant documents, this should include: • reasons for catheterisation • date and time of catheterisation • catheter type, length and size • amount of water instilled into the balloon • batch number and manufacturer • drainage system used • problems negotiated during the procedure • review date to assess the need for continued • catheterisation or date of change of catheter | To provide a point of reference or comparison in the event of later queries |
28. Record patient experience and any problems. | To provide a point of reference or comparison in the event of later queries |
Appendix C
Female urethral catheterisation – insertion procedure
The equipment needed is the same as for male catheterisation (Appendix B)
| Action | Rationale |
| 1–12. Same as for male catheterisation | |
| 13. Place dressing/protective towel under the patient | To create a protective field |
| 14. Put on gloves | To reduce risk of cross-infection |
| 15. Clean the meatus: labia majora, then the labia minor and finally the urethral meatus. One swab – one wipe anterior to posterior. | To avoid wiping any bacteria from the perineum and anus forwards towards the urethra |
| 16. Put on sterile gloves | To prevent infection |
| 17. Separate the labia with one hand and give traction upwards | To have a good view of the meatus and minimise the risk of contamination of the urethra |
| 18. Apply a little lubrication to the meatus and then insert the conus of the syringe with (anaesthetic) lubrication in the meatus and slowly instil 6 ml gel into the urethra. Then remove the nozzle from the urethra. | Adequate lubrication helps to prevent urethral trauma. Use of a local anaesthetic minimises the discomfort experienced by the patient and can add to the success of the procedure. |
| 19. Pick up the catheter with the hand in the sterile glove. Insert the catheter in the meatus and gently advance the catheter along the urethra until it reaches the bladder and urine flows out. Then insert the catheter 2 cm deeper. | Inadvertent inflation of the balloon in the urethra causes pain and urethral trauma [67, 238] To ensure that the balloon is in the bladder |
| 20. Slowly inflate the balloon according to the manufacturer´s direction, having ensured that the catheter is draining urine beforehand. | Inadvertent inflation of the balloon in the urethra causes pain and urethral trauma [67, 238] |
| 21. Withdraw the catheter slightly | To ensure that the balloon sits at the bladder base, ensuring optimal urine drainage |
| 22. If the patient desires, secure the catheter using a support strap. Ensure that the catheter does not become too tight when the patient is mobilising. | To maintain patient comfort and to reduce the risk of urethral and bladder neck trauma |
| 23. Ensure that the labia are cleaned after the procedure | To avoid skin irritation |
| 24. Help the patient into a comfortable position. Ensure that the patient’s skin and the bed are both dry. | If the area is left wet or moist, secondary infection and skin irritation may occur |
| 25–29. Same as in male catheterisation (Appendix B) point 24-28 |
Appendix D
Insertion of a suprapubic balloon catheter
| Action | Rationale |
| 1. Any practitioner (medical or nursing) who undertakes initial suprapubic catheter insertion or suprapubic re-catheterisation should have undergone a programme of training and clinical supervision and be assessed as competent to undertake this procedure [98] | To comply with the correct protocols and procedures and minimise risk |
| 2. Patients should have the procedure performed in a controlled environment | To minimise short- and long-term risks of complications of suprapubic catheterisation |
| 3. An indwelling catheter is inserted into the bladder midline above the symphysis pubis | Correct anatomical position |
| 4. Aseptic technique should be used to minimise the risk of infection at the time of initial insertion | To minimise short- and long-term risk |
| 5. Insertion can be performed by using local anaesthetic injected into the subcutaneous tissue at the site of anatomical entry, followed by a Seldinger or traditional trocar technique | Use of local anaesthetic minimises the discomfort experienced by the patient |
| 6. Insertion of a suprapubic catheter may also be performed under general anaesthesia or under cystoscopy | Use of general anaesthetic minimises the discomfort experienced by the patient and aids insertion of the suprapubic catheter |
| 7. Once a tract into the bladder has been made then ideally a catheter no smaller than 12-14 Ch (in adults) should be used to drain the bladder | To maintain a patent tract, and aid drainage and future catheter changes |
| 8. Using a size 12–14 Ch or above catheter with a 10-ml balloon allows for a patent and maintained tract to form between the bladder and skin [101] | To maintain a patent tract, and aid drainage and future catheter changes |
Appendix E
Patient information about common problems with indwelling catheter equipment
| Observation | Management |
| 1. Emptying bag problem | Check whether there are other systems with different taps |
| 2. Incorrect position of the drainage bag above the level of the bladder | Teach patient to check regularly position of drainage bag |
| 3. Over-full drainage bag | Clockwise emptying of drainage bag or write a protocol to see over time, when over-filling of the bag occurs. Mobile phone or alarm watch can be used. Ensure drainage bag is supported/stabilised correctly, advise patient/carer regarding catheter stabilisation devices. |
| 4. Clothing problem | There are different clothes on the market such as underwear for catheterised patients (e.g. CathWear). |
| 5. Occlusion of catheter lumen by tight clothing | Teach patients about occlusion by tight clothing. Teach patients to check if necessary. |
| 6. Catheter straps occluding the non-return valve of the drainage bag | Try different straps or catheter bag support products; e.g., leg pockets/sporrans to support drainage bag |
| 7. Incorrect position of tubing | Should be correctly positioned and secured to allow free drainage and patient mobility |
| 8. Change in odour or colour of urine | See Appendix G: Possible colour and odour changes in urine. Inform patient about possible reasons for odour/colour change. Change in odour may be caused by UTI but this is not a reliable indicator of bacteriuria or infection. [109] |
| 9. Kinking of catheter | Try non-kinking catheter tubes. Check the positioning of the drainage bag. Tube can be stabilised with tape. |
| 10. No flow of urine | Check whether the drainage bag is full, there is a kink in the catheter or drainage conduit, the catheter is still in the bladder, and there is sufficient fluid intake. |
[51, 100, 212, 215, 216]
Appendix F
Observation of urinary drainage
| Observation | Management |
| 1. Is the drainage bag full? | Empty the drainage bag |
| 2. Is there a bend in the catheter or drainage conduit? | Make sure that the catheter and drainage tubing are not kinked or trapped |
| 3. Is the catheter blocked? | Lower the drainage system to aid gravity to see if urine then flows |
| 4. Is the catheter still in the bladder? | Check position of the catheter, is the balloon visible? |
| 5. Is the catheter balloon in the urethra? | Check if the patient experiences any pain, check if the balloon is visible. If so, remove the catheter after deflating the balloon. |
Appendix G
Possible colour and odour changes in urine due to food or medication
| Medication | Colour or odour of urine |
| Amitriptyline | Blue-green |
| Anthraquinones | Red-brown (in alkaline urine) |
| Antibiotics (not all) | Offensive smell |
| Chloroquine | Rusty brown, yellow |
| Danthron | Orange |
| Ferrous salts | Black |
| Ibuprofen | Red |
| Imipenem-cilastatin | Darkening on standing |
| Indomethacin | Green |
| Levodopa | Darkens |
| Methylene blue | Blue |
| Methyldopa and metronidazole | Darkens (red-black on standing) |
| Nitrofurantoin | Pink (alkaline) - brown |
| Phenothiazines | Pink to red-brown |
| Phenytoin | Red |
| Rifampicin | Yellow-orange to red to brown |
| Senna | Yellow-brown (acid urine); yellow-pink (alkaline urine) darkens on standing |
| Sulphonamides | Greenish blue |
| Triamterene | Green-blue |
| Uropyrine | Orange |
| Vitamin B complex | Dark yellow |
| Warfarin | Orange |
| Caused by food and drink | |
| Asparagus | Green colour and offensive smell (not in all patients) |
| Beetroot | Pink to dark red |
| Carotene | Brown |
| Red fruit drinks | Pink to dark red |
| Oily fish | Fishy |
| Senna and rhubarb | Yellow to brown or red |
| Total parenteral nutrition | Offensive |
| Certain food smells appear to pass through into the urine, e.g. onions, garlic, asparagus, some spices. | |
Adapted from Landowski (2008) [240], Wallach (1992) [241] and Watson (1987) [242], [109]

 Fig. 42 Urine Colour Chart - example
Adapted from Urine Colours Chart Sherry Haynes 2008
Appendix H
Preparation and procedure for changing a suprapubic catheter
Comply with local protocols and procedures with regard to change of suprapubic catheter (male and female).
Checklist equipment:
- Sterile catheterisation pack containing specimen containers, kidney shaped dish, low-linting swabs, and disposable towels
- Disposable pad for bed protection
- 2 pairs of gloves; one of which must be sterile for handling catheter
- Selection of appropriate catheters; it is advisable to take a spare catheter in addition to the one you want, and one of a different/smaller size
- Sterile anaesthetic lubricating jelly (1 or 2 tubes)
- Universal specimen container, if required
- Cleansing solution
- Bactericidal alcohol hand disinfectant
- 10 ml sterile water (inflation of balloon), or as recommended by manufacturer
- Syringe and needle to draw up sterile water and inflate balloon
- Disposable plastic apron/protective clothing
- A closed urinary drainage system; e.g., a night bag, leg bag or catheter valve
- A catheter drainage bag stand, if required
- Dressing and wound care set (supplementary pack)
| Action | Rationale |
| 1. Check patient file for past problems and allergies etc. During the procedure explain the process to the patient. | To ensure the patient understands the procedure |
2 a) Undertake procedure on the patient’s bed or in clinical treatment area using screens/ curtains b) Assist the patient to get into the supine position to ensure the suprapubic tract is accessible c) Do not expose the patient at this stage of the procedure | To ensure patient’s privacy To maintain patient’s dignity procedure and comfort |
| 3. Wash hands using soap and water or bactericidal alcohol hand rub | To reduce risk of infection |
| 4. Put on a disposable plastic apron or protective clothing | To reduce risk of cross-infection from microorganisms on uniform |
| 5. Clean and prepare the trolley, placing all equipment required on the bottom shelf. Assemble all of the necessary equipment. The catheter size and amount of water instilled in the balloon should be the same as the existing suprapubic catheter. | The top shelf acts as a clean working surface. To ensure you have all required equipment. |
| 6. Take the trolley to the patient’s bedside | Equipment easily to hand to perform procedure |
| 7. Open the outer cover of the catheterisation pack and slide the pack onto the top shelf of the trolley | To prepare equipment |
| 8. Using aseptic technique, connect the bag to the catheter | To reduce the risk of cross-infection |
| 9. Using aseptic technique, open the supplementary packs | To reduce the risk of cross-infection |
| 10. Remove cover that is maintaining the patient’s privacy and position a disposable pad under the patient’s buttocks and thighs | To ensure urine does not leak onto bed |
| 11. Clean hands with a bactericidal alcohol hand rub | Hands may have become contaminated by handling the outer packs |
| 12. Put on gloves | To reduce risk of cross-infection |
| 13. Observe the current suprapubic site for the lie of the catheter, angle of insertion and how much of the catheter length is visible outside the body, as this information will be a useful guide for insertion of the new catheter | To aid removal and re-insertion of suprapubic catheter |
| 14. Place dressing/protective towel across the patient’s abdomen | To create a protective field |
| 15. Lift the present catheter using a gauze swab and clean the cystostomy site with the solution | To reduce the risk of introducing infection |
| 16. Replace existing gloves with a sterile pair and place new sterile towel at the cystostomy site | It is too early for the sterile gloves when preparing for an aseptic catheterisation procedure. They must be put on just before placing the new catheter. |
| 17. Deflate balloon without suction of existing catheter and remove catheter. Ensure you have sterile gauze at hand, to put on the cystostomy site to prevent leakage. After this has been carried out it is advisable to put on sterile gloves and insert the new catheter immediately. | To prevent a cuff or wrinkles at the balloon; it will aid success of the procedure. A 2-person technique can be used, 1 removes the catheter while the “aseptic” person inserts the new catheter. |
| 18. Insert 5–10 ml water-soluble lubricant or local anaesthetic gel into the suprapubic tract. Advance the catheter into the tract 3 cm deeper than it was before and not more to prevent the catheter tip irritating the bladder wall and to prevent the catheter passing the urethra. If no urine drains, gently apply pressure over the symphysis pubis area. Once urine drains, insert the catheter ~5 cm further to ensure the catheter is in the bladder and not the suprapubic tract. | Adequate lubrication helps to prevent trauma. Use of a local anaesthetic minimises the discomfort. |
| 19. Slowly inflate the balloon according to the manufacturer’s instructions, having ensured that the catheter is draining urine beforehand | Inadvertent inflation of the balloon in the suprapubic tract causes pain and trauma |
| 20. Withdraw the catheter slightly and attach the drainage bag/system if this has not already been done | Withdrawing the catheter ensures the balloon sits in the bladder, ensuring optimal urine drainage |
| 21. Secure the catheter using a support strap. Ensure that the catheter does not become taut when patient is mobilising | To maintain patient comfort and to reduce trauma/traction being applied to the stoma |
| 22. Help the patient into a comfortable position. Ensure that the patient’s skin and the bed are both dry. Assist the patient with dressing into own clothing. | If the area is left wet or moist, secondary infection and skin irritation may occur. Maintain privacy and dignity. |
| 23. Measure the amount of urine | To be aware of bladder capacity for patients with previous urinary retention. To monitor renal function and fluid balance. It is not necessary to measure the amount of urine if the patient is having the urinary catheter routinely changed. |
| 24. Take a urine specimen for laboratory examination, if required | To rule out urinary tract infection |
| 25. Dispose of equipment in a plastic clinical waste bag and seal the bag before moving the trolley | To prevent environmental contamination |
26.
| To provide a point of reference or comparison in the event of later queries |
| 27. Record patient experience and any problems. See Catheter change record (Appendix Q). | To provide a point of reference or comparison in the event of later queries |
Non-touch technique for changing a suprapubic catheter
Use the internal package of the indwelling catheter to place the catheter in the bladder. Do not touch the catheter itself.
| Action | Rationale |
| 1 – 14. The same as above | |
| 15. Place the receiver containing the catheter on the sterile field. Remove the exterior package of the indwelling catheter. Open the package of the urinary bag and remove the pre-perforated part of the interior package at the end of the indwelling catheter and connect the urinary bag. | To prevent contamination of the catheter |
| 16. Deflate balloon (without suction) of existing catheter and remove catheter | To prevent a cuff or wrinkles at the balloon |
| 17. Insert 5–10 ml water-soluble lubricant or local anaesthetic gel into the suprapubic tract | Adequate lubrication helps to prevent trauma. Use of a local anaesthetic minimises the discomfort experienced by the patient and can aid success of the procedure. |
| 18. Remove the pre-perforated front part of the internal package so that the first 5 cm of the catheter is free. Advance the catheter into the tract no more than 3 cm deeper than it was before, to prevent the catheter tip irritating the bladder wall and the catheter passing the urethra. When no urine drains, gently apply pressure over the symphysis pubis area. Once urine returns, insert the catheter ~5 cm further to ensure that it is in the bladder and not the suprapubic tract. | Advancing the catheter ensures that it is correctly positioned in the bladder 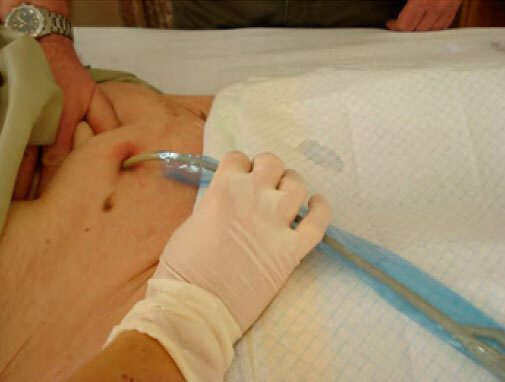 Fig. 43 Non-touch technique (Courtesy of C. Vandewinkel) |
| 19. Slowly inflate the balloon according to the manufacturer’s instructions, having ensured that the catheter is draining urine beforehand | Inadvertent inflation of the balloon in the suprapubic tract causes pain and trauma |
| 20. Open the rest of the package by the pre-perforated part and remove the package | |
| 21. Withdraw the catheter slightly | Withdrawing the catheter ensures that the balloon sits in the bladder, ensuring optimal urine drainage |
| 22. Secure the catheter using a support strap. Ensure that the catheter does not become taut when the patient is mobilising. | To maintain patient comfort and reduce trauma/traction being applied to the stoma |
| 23. Help the patient into a comfortable position. Ensure that the patient’s skin and the bed are both dry. Assist the patient with dressing into own clothing. | If the area is left wet or moist, secondary infection and skin irritation may occur. Maintain privacy and dignity. |
| 24. Measure the amount of urine | To be aware of bladder capacity for patients with previous occurrences of urinary retention. To monitor renal function and fluid balance. It is not necessary to measure the amount of urine if the patient is having the urinary catheter routinely changed. |
| 25. Take a urine specimen for laboratory examination, if required | To rule out urinary tract infection |
| 26. Dispose of equipment in a plastic clinical waste bag and seal the bag before moving the trolley | To prevent environmental contamination |
| 27. Record information in relevant documents, including: a. reasons for catheterisation b. residual volume c. date and time of catheterisation d. catheter type, length and size e. amount of water instilled into the balloon f. batch number and manufacturer g. drainage system used h. problems negotiated during the procedure i. review date to assess the need for continued catheterisation or date of change of catheter j. observation of cystostomy site See Chapter 12 | To provide a point of reference or comparison in the event of later queries |
| 28. Record patient experience and any problems. See Catheter change record (Appendix Q). | To provide a point of reference or comparison in the event of later queries |
Changing a suprapubic catheter with a Seldinger technique
An open-end catheter is used. Special changing sets are available. (see Section 5.3)
| Action | Rationale |
| 1 – 14. The same as above | |
| 15. Place the receiver containing the catheter on the sterile field. Connect the collecting bag/the catheter system. Disconnect the catheter. | To prevent contamination of the catheter |
| 16. Pull the catheter straight upwards and keep it in this position. Insert the mandrain through the catheter 3 cm further than the length of the catheter. Deflate balloon (without suction) of existing catheter and remove catheter. Remove the old catheter over the mandrain and keep the mandrain in the same position. After this has been carried out it is advisable to put on sterile gloves and insert the new catheter immediately. | To prevent a cuff or wrinkles at the balloon A 2-person technique can be used: 1 person removes the catheter while the “aseptic” person inserts the new catheter |
| 17. Insert 5–10 ml water-soluble lubricant or local anaesthetic gel into the suprapubic tract. Bring the new catheter over the mandrain. Advance the new catheter into the tract no more than 3 cm deeper than it was before. When no urine drains gently apply pressure over the symphysis pubis area. Once urine returns, insert the catheter ~5 cm further to ensure the catheter is in the bladder and not the suprapubic tract. Remove the mandrain | Adequate lubrication helps to prevent trauma. Use of a local anaesthetic minimises the discomfort. Advancing the catheter ensures that it is correctly positioned in the bladder, to prevent the catheter tip irritating the bladder wall and the catheter passing the urethra |
| 18. Slowly inflate the balloon according to the manufacturer’s instructions, having ensured that the catheter is draining urine beforehand | Inadvertent inflation of the balloon in the suprapubic tract causes pain and trauma |
| 19. Withdraw the catheter slightly and attach the drainage bag/system if this has not already been done | Withdrawing the catheter ensures the balloon sits in the bladder, ensuring optimal urine drainage |
| 20. Secure the catheter using a support strap. Ensure that the catheter does not become taut when patient is mobilising. | To maintain patient comfort and to reduce trauma/traction being applied to the stoma |
| 21. Help the patient into a comfortable position. Ensure that the patient’s skin and the bed are both dry. Assist the patient with dressing into own clothing. | If the area is left wet or moist, secondary infection and skin irritation may occur. Maintain privacy and dignity. |
| 22. Measure the amount of urine | To be aware of bladder capacity for patients with previous occurrences of urinary retention. To monitor renal function and fluid balance. It is not necessary to measure the amount of urine if the patient is having the urinary catheter routinely changed. |
| 23. Take a urine specimen for laboratory examination, if required | To rule out urinary tract infection |
| 24. Dispose of equipment in a plastic clinical waste bag and seal the bag before moving the trolley | To prevent environmental contamination |
25. Record information in relevant documents, including:
| To provide a point of reference or comparison in the event of later queries |
| 26. Record patient experience and any problems See Catheter change record (Appendix Q) | To provide a point of reference or comparison in the event of later queries |
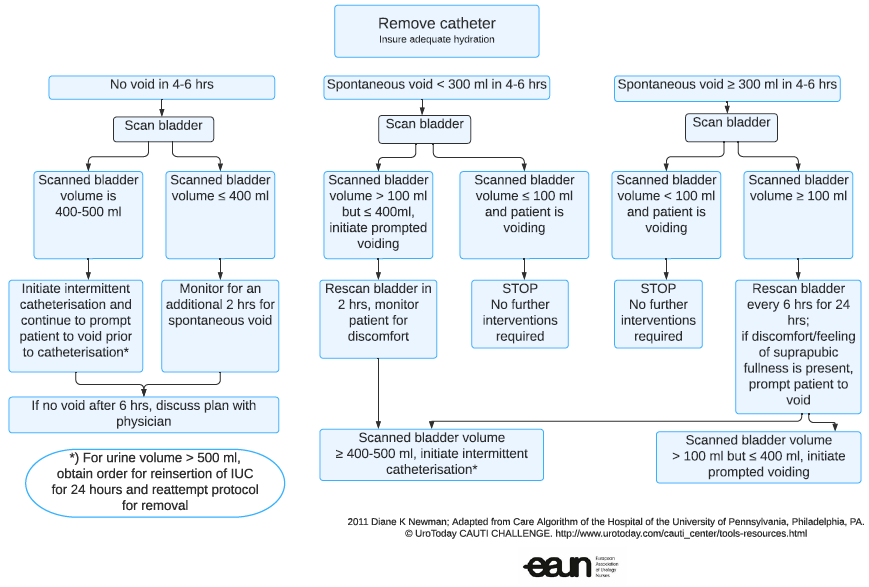
Appendix I
Removal of an indwelling urethral catheter - protocol
Appendix J
Removal of a urethral catheter – procedure
Checklist equipment:
- Disposable gloves
- Syringe for deflating balloon
- Disposable pad (to protect bed)
- Plastic disposable apron or protective clothing
- Gauze swabs/disposable wipes
| Action | Rationale |
| 1. Catheters can be removed at night before 24 hours. Catheters are often removed early in the morning (refer to local policy). | Shorter hospital stay. So that any retention problems can be dealt with during the day. |
| 2. Explain procedure to patient and inform them of the potential symptoms that may occur following removal; i.e., incontinence, urgency, frequency, dysuria, discomfort and retention Symptoms should resolve over the following 24–48 hours. If not, further investigation may be needed; e.g., mid-stream urine specimen taken for culture. Discuss the need for an adequate oral fluid intake of 2–3 l/day (30 ml/kg/day) | For adequate flushing of the bladder, and to help dilute and expel debris or infected urine, if present |
| 3. Check volume of water in balloon (refer to patient documentation), then use syringe to deflate balloon | To confirm how much water is in the balloon. To ensure balloon is completely deflated before removing catheter. [127, 243, 244] |
| 4. Attach the syringe to catheter valve to deflate the balloon. Do not use suction on the syringe but allow the solution to come back spontaneously. [127] | |
| 5. Ask patient to breathe in and then out: as patient exhales, gently remove the catheter. Male patients should be warned of discomfort as the deflated balloon passes through the prostatic urethra. | To relax pelvic floor muscles |
| 6. Clean meatus using gauze/disposable wipe, clear away equipment, and make the patient comfortable | |
| 7. Used equipment should be placed in clinical waste bag and disposed of in line with local policy | To reduce risk of cross-infection to others |
Appendix K
Removal of a suprapubic catheter – procedure
Checklist equipment:
- Disposable gloves
- Syringe for deflating balloon
- Disposable pad (to protect bed)
- Plastic disposable apron or protective clothing
- Gauze swabs/disposable wipes
- Sterile absorbent dressing and tape
| Action | Rationale |
| 1. Patient dignity | |
| 2. Explain procedure to patient and inform him of the potential symptoms that may occur following removal; i.e. incontinence, urgency, frequency, dysuria, discomfort and retention. Possibly also loss of urine through the suprapubic fistula. Symptoms should resolve over the following 24–48 hours. If not, further investigation may be needed; e.g., mid-stream urine specimen taken for culture. Discuss the need for an adequate oral fluid intake of 2–3 l/day (30 ml/kg/day) | For adequate flushing of the bladder, and to help dilute and expel debris or infected urine, if present |
| 3. Check volume of water in balloon (refer to patient documentation), then use syringe to deflate balloon | To confirm how much water is in the balloon. To ensure balloon is completely deflated before removing catheter. [127, 243, 244] |
| 4. Attach the syringe to catheter valve to deflate the balloon. Do not use suction on the syringe but allow the solution to come back spontaneously. [127] | To prevent cuff and wrinkles at the balloon |
| 5. Ask patient to breathe in and then out: as patient exhales, gently remove the catheter | To relax pelvic floor muscles |
| 6. Clean suprapubic fistula using gauze/disposable wipe, clear away equipment, put on an occlusive absorbent dressing and make the patient comfortable Ask the patient to sit or walk and not lie down Check whether the dressing is dry after 1 hour. If not, check regularly until it is dry. | Large absorbent dressing is for the loss of urine that can be voluminous in the beginning To prevent a voluminous loss of urine Sometimes it takes 1 day before the fistula is dry |
| 7. Used equipment should be placed in clinical waste bag and disposed of in line with local policy | To reduce risk of cross-infection to others |
| 8. Document procedure and note any difficulties/problems experienced Commence fluid balance chart for monitoring patient’s ability to void urine following removal of the catheter | To ensure any problems are documented for future reference To monitor for potential problems following removal of catheter; e.g., retention of urine. If patient does not void in the first 4–6 hours, or if they are experiencing suprapubic pain, a bladder scan and discussion with medical team are indicated. Re-catheterisation could be indicated in this event. |
Appendix L
Troubleshooting for indwelling catheters (problem management)
| Problem | Cause | Suggested action |
| 1. UTI introduced during catheterisation | Inadequate aseptic technique and/or urethral cleansing. Contamination of catheter tip. | Manage and treat immediate symptoms, inform medical staff. Obtain a catheter specimen of urine. |
| 2. UTI introduced via the drainage system | Inappropriate handling of equipment. Breaking the closed system. | As above |
| 3. Urethral mucosal trauma | Incorrect size or positioning of catheter. Poor insertion technique. Creation of false passage as a result of catheter insertion technique | Check the catheter support and apply or reapply as necessary. Re-catheterise the patient using the correct size catheter. Remove catheter if not draining urine. Seek medical advice. |
| 4. Inability to tolerate indwelling catheter | Urethral and/or bladder mucosal irritation Impact on patient’s self- image | Use catheter support strap to prevent unnecessary pulling. Discuss use of anticholinergic medication with medical staff. Consider use of 100% silicone catheter in cases of suspected latex hypersensitivity. [95, 96, 245] Explain the need for and function of the catheter. Offer reassurance and support. Discuss alternative management options with the multidisciplinary healthcare team. |
| 5. Inadequate drainage of urine | Kinked drainage tubing Blocked tubing; e.g., blood clots or debris. Incorrect placement of a catheter; e.g., in bladder neck | Ensure free flow of urine If a 3-way catheter is in place commence irrigation. If a standard indwelling catheter is in use, see Chapter 8, Bladder washout. Re-site the catheter |
| 6. Leakage of urine around catheter (bypassing) | Bladder irritation Irritation from the catheter balloon Incorrect size of catheter | Ensure the catheter/drainage system is well supported. Discuss use of anticholinergic therapy with medical staff. Ensure a 10-ml balloon catheter has been used for standard drainage Replace with the correct size, usually ≤ 2 Ch |
| 7. Catheter falls out | Incorrect filling of the balloon Incorrect fixation of a balloon-free catheter Catheter balloon may have deflated, accidental trauma | Check whether the amount of water in the balloon was sufficient Check fixation of the catheter Catheter needs to be replaced as soon as possible as the suprapubic tract may close. Contact catheter nurse specialist or health care professional immediately for re-insertion of new catheter. |
Appendix M
Potential problems during catheter removal
| Problem | Cause | Suggested action |
| 1. Unable to deflate balloon | Damaged or faulty valve on inflation/deflation arm of the catheter Channel obstruction | Check the valve for evidence of damage. Try adding 2–3 ml sterile water into inflation channel to dislodge blockage. If unsuccessful, use a syringe and needle to aspirate the fluid from the inflation arm (above the valve). Attach syringe to the inflation arm and leave in place for 20–40 minutes. The effect of gravity will help with the deflation process. Squeeze the visible tubing to try and displace crystal formation in inflation channel. Snip the balloon tube and insert a small mandrain and perforate the balloon. It is necessary that the bladder is full and the balloon is retracted to the bladder neck. If the above are unsuccessful, refer to medical staff as the balloon will need to be punctured suprapubically using a needle under ultrasound visualisation. Following catheter removal, the balloon should be inspected to ensure that it is intact and there are no fragments left in the bladder. |
| 2. Wrinkling of balloon following deflation resulting in formation of a cuff | Balloon unable to return to pre-inflation shape resulting in formation of a ridge | Withdraw catheter gently on deflation of balloon, but if resistance is experienced, stop the procedure. Using a syringe re-insert 1–2 ml saline back into the balloon; this action will prevent formation of a cuff. Withdrawal of the catheter should now be easier and patient discomfort and potential urethral trauma will be reduced. |
| 3. Pain | Balloon cuffing (as above) or sensitivity experienced at the bladder neck or within the urethra from the catheter | Good patient preparation and support throughout the procedure is essential so that the patient is relaxed and fully aware of what to expect. Inserting anaesthetic (lignocaine/lidocaine) gel into the drainage port of the catheter 3–5 minutes prior to removal can reduce sensitivity at the bladder neck. It should be noted that > 2–3 ml will be needed as this volume will remain within the catheter. |
Note: If you experience any product failure or difficulties, it is important that the manufacturer is contacted and informed of the problem.
Appendix N
Potential problems following catheter removal
| Problem | Cause | Suggested action |
| 1. Frequency and dysuria | Inflammation of the urethral mucosa | Ensure a fluid intake of 2-3 l/day (30 ml/kg/day). Advise the patient that frequency and dysuria are common but will usually be resolved once micturition has occurred at least 3 times. Inform medical staff if the problem persists. |
| 2. Retention of urine | Inability of the bladder to empty. Patient anxiety. | Encourage the patient to increase fluid intake. Offer the patient a warm bath to promote relaxation. If Unsuccessful, perform manual palpation of the bladder or a bladder scan (if the equipment is available). Inform medical staff if the problem persists as the patient may require re-catheterisation. |
| 3. Bacteriuria/ urinary tract infection (UTI) | Resulting in frequency and dysuria | Encourage a fluid intake of 2-3 l/day to promote flushing of the bladder. Collect a specimen of urine if symptoms persist and inform medical staff. Administer prescribed antibiotics. |
| 4. Small amounts of blood at the start, throughout or at the end of the patient’s urine stream | Minor damage of tissue in urethra | Encourage the patient to increase fluid intake. Reassure patient that the condition is harmless. Inform patient of signs of UTI. |
| 5. Urge to urinate and not reach the container or bathroom in time | Explain to the patient this resolves mostly within the first 24–48 hours. If not, urinary culture to exclude UTI. | |
| 6. Dribbling. This problem should subside within several days. | Give patient pads. Teach patient pelvic floor exercises. Explain that this is mostly a short-term complication as result of the catheter. |
[93]
Appendix O
Bladder washout – procedure and troubleshooting
Before starting the procedure you have to consider:
- Management and maintenance of 3-way Foley catheter (Fig. 44) involves a closed drainage system and sterile technique
- Saline solution for infusion should be stored and infused at room temperature to avoid bladder spasms
- Strict intake and output is recommended for all patients receiving continuous bladder irrigation. Special attention should be paid to frail older patients and/or patients with history of pelvic floor or bladder radiation. These patients are at high risk for bladder perforation.
Equipment
- Sterile 0.9% sodium chloride irrigation bags (3 l)*
- Irrigation tubing
- Foley (3-way)
- Large Foley drainage bag
- 60-ml syringe
- Sterile saline (50 ml)
*A Cochrane systematic review (2017) concluded that the evidence was not adequate to conclude if washouts were beneficial or harmful. Further rigorous, high quality trials that are adequately powered to detect benefits from washout being performed as opposed to no washout are needed. Trials comparing different washout solutions, washout volumes, and frequencies or timings are also needed. [157]
Implementation process
- Foley (3-way) insertion (see Sections 5.1.4. and 6.2)
- Connect the middle lumen to drainage bag (2 l)
- Connect the third lumen to sodium chloride irrigation bags. The speed of irrigation depends on haematuria and bladder characteristics.
- Use strict aseptic technique when handling any of the equipment to prevent introduction of microorganisms into the urinary tract
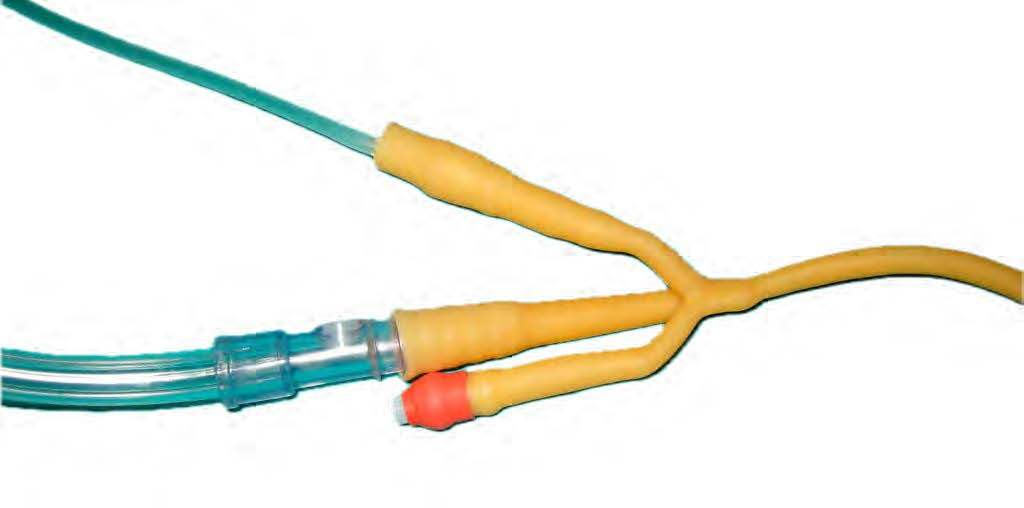
Fig. 44 Three lumen catheter for continuous bladder irrigation
(Courtesy of M. Gea-Sánchez)
Troubleshooting
1. Drainage out is less than irrigation infused
- Stop irrigation (recalculate intake and output)
- Ensure that tubing is not kinked or looped below bladder level
- Palpate bladder for distention (use bladder scanner if available, to facilitate genitourinary assessment as per unit’s routine)
- If obstruction is suspected, gentle manual irrigation may be required as per physician’s orders
- Cleanse the catheter opening. Use nothing smaller than a 60-ml syringe and sterile saline (Fig. 45)
- Use slow, even pressure to avoid damaging the bladder wall. Do not force if resistance is met
- Allow irrigation to flow back freely

Fig. 45 Syringe (60 ml) and sterile saline to remove clots
(Courtesy of: M. Gea-Sánchez)
2. Increased bloody drainage or presence of clots
- Increase rate of irrigation infusion as per physician’s orders
- Irrigation of catheter as outlined in 1 to aid in clot removal may be indicated
- If large amount blood or clots persists, notify physician
3. Patient complains of pain (complete pain assessment using the 0–10 or visual analogue scale)
- Palpate bladder to determine presence of distention
- Check drainage tubing for kinks
- Observe drainage for adequate amount, presence of clots that might be blocking drainage tube. Evaluate intake and output
- Avoid cold irrigation solution as it may cause bladder spasm
4. The patient is confused/agitated
- Assess if patient is orientated to time, place and person
- Have relevant information ready to share (i.e., amount of opioids received, amount of CBI received, true urine output, time of onset of alteration in orientation, sodium level; in transurethral resection of the prostate syndrome an overload of fluid through the prostatic sinuses can lead to dilutional hyponatremia, confusion and hypertension)
5. Solution leaks around the Foley catheter
- Assess for bladder spasms
- Refer to 1 – assessing for obstruction
- Consider administering antispasmatic; e.g., hyoscine butylbromide (Buscopan)
6. Catheter falls out
- If recognised immediately, attempt re-insertion with a new catheter of the same size with liberal use of lubricating gel.
- If delayed presentation of if immediate replacement is unsuccessful, catheterise urethrally if possible.
- Fill the bladder with sterile water/saline via the urethral catheter.
- If fluid is seen to leak from the SPC site, attempt guidewire insertion and re-catheterisation.
- If this is unsuccessful or if no fluid emerges from the SPC site, appropriate and safe arrangements should be made for formal re-insertion.
Documentation
Documentation includes:
- Patient’s comfort/pain level (how procedure is being tolerated)
- Colour and type of drainage, presence of clots/fragments
- Intake and output; use the following calculation:
CBI infused − Foley output = True urine output - Interventions required (manual irrigation, use of bladder scanner)
- Health teaching done with patient and family
- Patient concerns/adverse reactions (e.g., continued bladder spasms or decreased total urine output), the nursing actions taken and patient outcomes
Adapted from: Grey Bruce Health Network. Continuous Bladder Irrigation Clinical Protocol. 2007. [193]
Appendix P
Obtaining a urine sample from an indwelling catheter – procedure
| 1. Obtain consent and ensure the procedure is performed maintaining patient dignity |
| 2. Wash your hands and put on an apron. Clean hands with alcohol hand rub. |
| 3. If there is no urine visible in the catheter tubing, a clamp may be placed a few centimetres distal to the sampling port |
| 4. Once there is sufficient urine visible in the drainage tube above the clamp, wipe the sampling port with an alcohol swab and allow to dry |
| 5. Insert a sterile syringe into the needle-free sampling port. Aspirate the required amount of urine. |
| 6. Remove the syringe and transfer specimen into sterile specimen pot |
| 7. Wipe the sampling port with an alcohol swab and allow to dry |
| 8. Unclamp the drainage tubing |
| 9. Dispose of all waste materials |
| 10. Wash hands |
| 11. Complete documentation according to the organisational guidelines |
| 12. Dispatch the specimen to the laboratory |
Appendix Q
Catheter change record - example
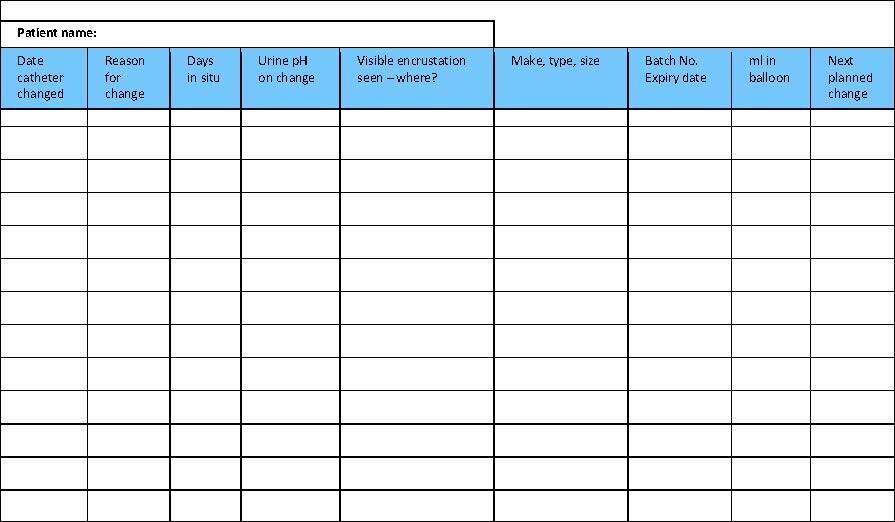
Example of catheter change record (adapted from Rew, 2005) [121]
Appendix R
Catheter drainage - decision flow chart
(Adapted from Mitchell 2008) [100]
Appendix S
PICO questions
| PICO 1 | Is there evidence that silicone catheters compared with other-material catheters | a) prevent encrustation in long-term catheterised patients? b) prevent infections in long-term catheterised patients? c) cause fewer complications such as strictures in long-term catheterised patients? d) cause fewer problems with flow? |
| PICO 2 | Is there evidence that antibiotic-impregnated catheters compared with non-impregnated catheters | a) decrease symptomatic infections in short-term and long-term indwelling catheter patients? |
| PICO 3 | Is there evidence that | over- or under inflation of the balloon causes occlusion of drainage eyes |
| PICO 4 | Is there evidence that urinary bags | a) that are reused increase the risk of symptomatic UTI? b) that are unsterile increase the risk of symptomatic UTI? c) need a special change interval to influence symptomatic UTI? d) that are disconnected from the catheter have an influence on symptomatic UTI? e) that are connected to a bed drainage bag have an advantageous effect on symptomatic UTI? |
| PICO 5 | Is there evidence that catheter valves compared with free drainage | a) increase the risk of symptomatic UTI? b) have any advantages? |
| PICO 6 | What is the effect of using catheter securement devices compared with not using securement devices on | a) symptomatic UTI? b) urethral trauma? c) health-related quality of life? |
| PICO 7 | What is the effect of using lubricating gel catheter compared with non-chlorhexidine lubrication and perhaps also silver or antibiotic lubrication | a) on patient comfort? b) symptomatic UTI? |
| PICO 8 | What is the effect of meatal cleansing with various cleansing agents/antiseptic products compared with water and soap | a) on symptomatic UTI? |
| PICO 9 | What is the effect of using saline to inflate the balloon compared with 10% glycerin/glycerol | a) on water loss from the balloon? |
| PICO 10 | What is the evidence on differences in symptomatic UTI when using the technique | a) ready to use versus catheter set? b) non-touch technique versus aseptic technique? |
| PICO 11 | What is the effect of clamping | a) of the indwelling catheter before removal compared to free drainage on b) for bladder training or on bladder functioning? |
| PICO 12 | What is the evidence that suprapubic balloon catheters compared with suprapubic catheters sewed on/stitched in place have advantages for | a) security? b) infections? c) comfort? |
| PICO 13 | Is there evidence on complication rate or type in relation to the | a) change intervals of catheter, urinary drainage bag? b) profession of the person who inserted the catheter? |
| PICO 14 | Is there evidence that cranberry capsules/juice compared with placebo | a) reduces the risk of UTI? |
| PICO 15 | Is there evidence that excessive fluid intake compared with fluid intake of 1.5–2 l reduces | a) encrustation? b) UTI? |
| PICO 16 | What is the effect of stop orders, protocols, reminder systems or following guidelines on | a) UTI? |
Appendix T
Quality improvement projects
Overview of quality improvement projects, their objectives and the most relevant results of the projects.
| Author | Project method /Study design | Aims of the project | Results |
| Baillie et al 2014 [231] | Retrospective cohort study | The usability and effectiveness of a computerised clinical decision support (CDS) intervention to reduce the duration of urinary tract catheterisation | Duration of catheterisation time was significant reduced and so did CAUTI |
Bell et al 2016 [246] | Quality improvement project | To reduce unnecessary catheter use • Education • Mandatory prompts and reminders • Patient tracking and Urine retention protocol | Shows a reduction in indwelling catheter use but numbers don´t allow further statistically analysis |
| Blondal et al 2016 [235] | Prospective cohort study with a before and after design | • Aligning knowledge from doctors and nurses • Focus on inserted catheters • Catheters without indication • Days with catheter incidence of CAUTI | The study resulted in significant reduction in proportion of catheter days as well as catheters inserted without appropriate indication following short educational interventions. |
| Conner et al 2013 [247] | Prospective pilot study | Catheter discontinuation protocol and education to achieve this | The nurse driven protocol shows significant reduction on catheter days |
| Dawson et al 2017 [230] | Multimodal approach | • Reduction of CAUTI • Catheter care pathway • Houdini Checklist • Catheter magnets • Bladder ultrasound scanner | During the process a lot of discussion on clearing of questions were necessary. In the conclusion they mention two significant challenges to reduce CAUTI: Staff engagement and accountability |
Dols et al 2016 [233] | Pilot Study | To reduce CAUTIs in intensive and transplantation care an CAUTI Education Fair was developed and a catheter protocol for insertion and maintenance was used | CAUTIs are reduced in the pilot, but information about significance is missing. |
| Fakih et al 2013 [248] | National programme | To reduce CAUTI | An ongoing project but barriers and solution when implementing CAUTI prevention are well explained. |
| Galiczewski et al 2017 [249] | Quasi experimental Study | To improve the CAUTI rate in a MICU due to observation in catheter insertion procedure | The study shows no changes in utilisation rates, CAUTIs are reduced but not significantly. |
| Jansen et al 2017 [250] | Components of care / Bundle for UTI Education and awareness campaign | To reduce the inappropriate use of IUCs | |
| Major-Joynes et al 2016 [251] | Nurse driven protocol for removal of indwelling catheters | • Create online education materials • Standard protocol • Create clinician awareness IUC order set clean up | No significant chance in IUC utilisation 19% reduction in CAUTI rate per 1000 days. |
| Marigliano et al 2012 [236] | Pre and post test | Knowledge and correct management on catheterised patients and a course for nurses and doctors | Statistically significant improvement in knowledge of catheterisation practice after an active educational intervention. |
| Meddings et al 2014 [229] | Systematic review | A broad systematic review of strategies to decrease UTI, CAUTI, and urinary catheter use that are anticipated to be helpful in the nursing home setting | While many studies reported decreased UTI, CAUTI, or urinary catheter use measures, few demonstrated statistically significant reductions perhaps because many were under-powered to assess statistical significance. Pooled analyses were not feasible to provide the expected impact of these inter-ventions in the nursing home setting. |
| Mody et al 2015 [252] | National initiative to prevent CAUTI | STOP CAUTI bundle with emphasis on professional development in catheter utilisation, catheter care and maintenance, and antimicrobial stewardship as well as promoting a patient safety culture, team building, and leadership engagement. | The effectiveness is evaluated by changes in CAUTI rates, catheter utilisation and improvement in staff knowledge. No results are shown in this article. |
| Mulcare et al 2015 [234] | Multiphase approach and a quasi experimental study design | Protocol for placement and management IUC in older adults in the emergency department | In a 6-month study period there was a reduction in the use of IUC and reduction on CAUTI. 81% of participants felt that the protocol has changed their practice. |
Naik et al 2016 [253] | Algorithm | Fast and frugal algorithm to strengthen diagnosis and treatment decisions for catheter-associated bacteriuria | A fast and frugal algorithm improves diagnosis and treatment accuracy for CAUTI and reduces inappropriate treatment of -asymptomatic bacteria. |
| Nealon et al 2018 [232] | Pilot study | Patient Urinary Catheter Extraction (PURCE) Protocol After 48 hours with IC the urinary bag was marked with a yellow tag | Following the PURCE Protocol reduced CAUTI rate. |