17. APPENDICES
Several procedures are described in the following pages. These procedures do not have a high level of evidence, but they are based on the experience (best practice) of the Working Group as well as on protocols and care standards of various hospitals. Consequently, the evidence level for these documents is mostly 4.
| Appendix | Description |
|---|---|
| Appendix A | Checklist for patient information |
| Appendix B | Male urethral catheterisation by a healthcare professional – Aseptic procedure |
| Appendix C | Female urethral catheterisation by a healthcare professional – Aseptic procedure |
| Appendix D | Male urethral catheterisation by a healthcare professional – Non-touch procedure |
| Appendix E | Female urethral catheterisation by a healthcare professional – Non-touch procedure |
| Appendix F | Intermittent urethral dilatation – female and male |
| Appendix G | Patient/caregiver teaching procedure for intermittent self-catheterisation – female and male |
| Appendix H | Help devices |
| Appendix I | Voiding diary |
| Appendix J | Changes in urine due to food and medication |
| Appendix K | Medical travel document for patients |
| Appendix L | Questionnaires/tools for evaluating intermittent catheterisation/intermittent self-catheterisation |
Appendix A
Checklist for patient information
This checklist is intended to assist healthcare professionals to check whether all the
information that patients need to know about intermittent catheterisation (IC) has been provided.
Patients need to know
- Purpose of IC
- Basic anatomical knowledge about the urogenital tract
- Technique to perform the IC procedure.
- The technique of IC may vary in different settings (e.g. hospital, outpatient clinic, and home)
- Techniques to avoid urinary tract infection (UTI)
- Educate about hand hygiene practices before and after procedure
- Wash genitalia with soap and water to avoid any infection
- Frequency to perform IC
- Possible complications that may occur during or after the IC procedure
- List equipment required for IC, name, size/length of catheter
- To check the expiry date of the material before use
- Availability of appropriate aids to help with catheterisation such as mirrors, hand grips, leg abductors, integrated drainage bags, and travel kits
- How to prepare the catheter for use
- Clean and disinfect reusable equipment and ensure safe storage of the catheters
- Proper and safe disposal of the used catheters
- How to obtain supplies of the catheter
- Lifestyle modification, importance of:
- hydration and fluid intake
- a healthy diet to avoid constipation
- good hygiene
- exercise - Recognising symptoms or the common signs of UTI:
- pain or burning sensation during urination
- frequent urination or urgency to urinate
- offensive/strong smelling urine
- change in urine colour, cloudy/dark, blood in urine
- fever, chills or shaking and other flu-like symptoms
- confusion, agitation or delirium in older adults, especially those with underlying health conditions
- difficulties during insertion or removal of the catheter - Instructions when travelling abroad
- Contact information for a healthcare professional in case of problems with bladder management and IC
- Follow-up care (encourage to have regular follow-up with healthcare professional to ensure the catheterisation technique)
Appendix B
Male urethral catheterisation by a health care professional – Aseptic procedure
Material for catheterisation
- Catheterisation pack; sterile content varies, but should at least contain:
- one drape
- one bowl with swabs
- one pair of gloves - One pair of non-sterile gloves
- Sterile catheter
Selection of appropriate catheters; it is advisable to take a spare catheter in addition to the one that is wanted, and one of a different/smaller size
(non-coated, hydrophilic or pre-lubricated) - Sterile (anaesthetic) lubricating gel (syringe 6 ml) (if the catheter is not
pre-lubricated) - Disposable towel
- Disposable pad for bed protection
- Container of 20 ml sterile water for hydrophilic catheter (if not pre-packed)
- Universal specimen container (if required)
- Cleansing solution (water and pH neutral soap)
- Bactericidal alcohol hand disinfection
- Catheter drainage bag or sterile receptacle for urine
| Action | Rationale |
| 1. Check the indication and patient file for past problems, allergies etc. | To maintain patient safety |
| 2. Before the procedure, explain the process to the patient | To gain consent and cooperation and to ensure the patient understands the procedure |
| 3. Undertake procedure on the patient’s bed or in clinical treatment area using screens/curtains. Assist the patient to get into a relaxed supine position of 30° (if possible) with the legs extended to ensure the penis is accessible. Do not expose the patient at this stage of the procedure. | To ensure patient’s privacy To maintain patient’s dignity and comfort |
| 4. Hand hygiene using soap and water/bactericidal alcohol hand rub. | To reduce risk of infection |
| 5. Clean and prepare the trolley, placing all equipment required on the bottom shelf | The top shelf acts as a clean working surface |
| 6. Take the trolley to the patient’s bedside | |
| 7. Open the outer cover of the catheterisation pack and slide the pack onto the top shelf of the trolley | To prepare equipment |
| 8. Make the swabs wet with the cleansing solution | To cleanse the genitals |
| 9. The following steps may vary if using a (a) coated or (b) non-coated catheter: (a) If using a pre-lubricated ready-to-use catheter, open the package and hang the package beside the patient or trolley. (a) If using a catheter with a lubricating bag in the package, break the lubricating bag, open the outer package, and hang the package with the catheter beside the patient. (a) If using a hydrophilic pre-lubricated or ready-to-use catheter, open the package and hang the package beside the patient. (b) If using a non-coated catheter, open the catheter package and lubricating gel and put it on the sterile drape. | To activate the coating of the catheter |
| 10. Using an aseptic technique, connect the bag to the catheter | To reduce the risk of cross-infection |
| 11. Remove cover that is maintaining the patient’s privacy and position a disposable pad or disposable towel under the patient’s buttocks and thighs | To ensure urine does not leak onto the bed |
| 12. Put on non-sterile gloves | To reduce risk of cross-infection |
| 13. Place a sterile drape across the patient’s thighs (if required by local policy) | To create a protective field |
| 14. Place the receptacle between the patient’s legs (if a receptacle is used) | |
| 15. Lift the penis and retract the foreskin using a gauze swab and cleanse the glans penis with the wet swabs (beginning with the curethral meatus, the glans and foreskin at the end). Use for each part a new swab. | To prevent infection To create a protective field |
| 16. Steps 16–18 refer to situation non-coated catheter only (b) Allow some gel on the meatus, insert the cone of the lubricant syringe. Instil 10–15 ml of the (anaesthetic) lubricating gel slowly into the urethra while holding the penis firmly below the glans with the thumb and fingers, and the syringe firmly onto the meatus to prevent the gel from leaking out. | Adequate lubrication helps to prevent urethral trauma. Use of a local anaesthetic minimises the discomfort experienced by the patient and can aid success of the procedure. |
| 17. (b) Remove the syringe from the urethra and hold the penis upright and closed so that the gel stays in the urethra. Alternatively, a penile clamp may be used. | |
| 18. (b) In case of anaesthetic lubrication, wait as recommended by the product (3–5 min). | To ensure a maximised anaesthetic effect |
| 19. Replace existing gloves with a sterile pair | To prevent infection |
| 20. Take the catheter with the other hand (wearing sterile gloves) | To prevent infection |
| 21. Insert the catheter in the meatus and gently advance the catheter into the urethra until urine drains (then insert the catheter 2 cm deeper), or until the end of the catheter. During insertion, hold the penis upright with traction of the other hand. | Advancing the catheter ensures that it is correctly positioned in the bladder. To be sure that the catheter is in the bladder. Lifting the penis straightens the urethra and facilitates catheterisation. |
| 22. Connect the catheter to the bag with an aseptic technique, if it has not been done before insertion of the catheter | To maintain closed system |
| 23. If no urine flows gently apply pressure over the symphysis pubis area. Do not use force if there are difficulties inserting the catheter. | To prevent injuries of urethra and bladder neck |
| 24. Make sure the urine collection bag is below the level of the bladder | Makes sure the urine flows |
| 25. When urine flow stops, withdraw the catheter very slowly, in centimetre steps. If the urine flow starts again during withdrawal, discontinue withdrawal and wait for the flow to stop before resuming catheter withdrawal. | Makes sure that the bladder is empty and prevents residual urine |
| 26. Discard the catheter completely | |
| 27. Ensure that the glans and penis are cleansed after the procedure and reposition the foreskin if present | Retraction and constriction of the foreskin behind the glans penis resulting in paraphimosis may occur if this is not done |
| 28. Help the patient into a comfortable position. Ensure that the patient’s skin and bed are both dry. | If the area is left wet or moist, secondary infection and skin irritation may occur |
| 29. Measure the amount of urine | To be aware of bladder capacity for patients with previous occurrence of urinary retention. To monitor renal function and fluid balance. |
| 30. Take a urine specimen for laboratory examination, if required. | To rule out urinary tract infection |
| 31. Dispose of equipment in a plastic clinical waste bag and seal the bag before moving the trolley | To prevent environmental contamination |
| 32. Record information in relevant documents; this should include: • reasons for catheterisation • residual volume • date and time of catheterisation • catheter type and size • colour and odour of urine • problems negotiated during the • procedure • patient experience and problems | To provide a point of reference or comparison in the event of later queries |
Appendix C
Female urethral catheterisation by a healthcare professional – Aseptic procedure
Material for catheterisation
- Catheterisation pack; sterile content varies, but should at least contain:
- one drape
- one bowl with swabs
- one pair of gloves - One pair of non-sterile gloves
- Sterile catheter
Selection of appropriate catheters; it is advisable to take a spare catheter in addition to the one that is wanted, and one of a different/smaller size (non-coated, hydrophilic or pre-lubricated) - Sterile (anaesthetic) lubricating gel (syringe 6 ml) (if the catheter is not
pre-lubricated) - Disposable towel
- Disposable pad for bed protection
- Container of 20 ml sterile water for hydrophilic catheter (if not pre-packed)
- Universal specimen container (if required)
- Cleansing solution (water and pH neutral soap)
- Bactericidal alcohol hand disinfection
- Catheter drainage bag or sterile receptacle for urine
| Action | Rationale |
| 1. Check the indication and patient file for past problems, allergies etc. | To maintain patient safety |
| 2. Before the procedure, explain the process to the patient | To gain consent and cooperation and to ensure the patient understands the procedure |
| 3. Undertake procedure on the patient’s bed or in clinical treatment area using screens/curtains to promote and maintain dignity. Assist the patient to get into a relaxed supine position of 30° (if possible). Do not expose the patient at this stage of the procedure. | To ensure patient’s privacy. To maintain patient’s dignity and comfort during the procedure. |
| 4. Hand hygiene using soap and water/bactericidal alcohol hand rub | To reduce risk of infection |
| 5. Clean and prepare the trolley, placing all equipment required on the bottom shelf. The top shelf acts as a clean working surface. | |
| 6. Take the trolley to the patient’s bedside | |
| 7. Open the set with swabs | To prepare equipment |
| 8. Make the swabs wet with the cleansing solution | To cleanse the genitals |
9. The following steps may vary if using a (a) coated or (b) non-coated catheter (a) When using a hydrophilic catheter that requires hydration, open the package and fill with sterile water (following the manufacturer’s instructions), and (a) Hang the packaging beside the patient or trolley and wait for the recommended time (a) When using a catheter with a lubricating bag in the package, break the lubricating bag, open the outer package, and hang the package with the catheter beside the patient (a) When using a hydrophilic pre-lubricated or ready to use catheter, open the package, and hang the package beside the patient (b) When using a non-coated catheter, open the catheter package and lubricating gel | To activate the coating of the catheter To activate the coating of the catheter |
| 10. Using an aseptic technique, connect the bag (if a bag is used) to the catheter | To reduce risk of cross-infection |
| 11. Remove cover that is maintaining the patient’s privacy and position a disposable pad or disposable towel under the patient’s buttocks and thighs | To ensure urine does not leak onto the bed |
| 12. Hand hygiene using soap and water/bactericidal alcohol hand rub | Hands may have become contaminated by handling the outer packs |
| 13. Put on non-sterile gloves | To reduce risk of cross-infection |
| 14. Spread the legs in a gynaecological position | To obtain a good view of the meatus |
| 15. Separate with one hand the labia and give traction upward with one hand | To ease cleaning of the labia and meatus |
| 16. If tweezers are used for inserting the catheter skip step 18 and read “tweezers” for “the hand with the sterile glove” in step 23 | |
| 17. Clean the labia majora exterior and then interior, and then the labia minor exterior, then interior, and finally the urethral meatus. One swab for each labia and meatus – use the wipe anterior to posterior. Alternatively, tweezers with swabs could be used for cleaning. | To avoid wiping any bacteria from the perineum and anus forwards towards the urethra |
| 18. Put on sterile gloves | To work aseptically and prevent infection |
| 19. Place the receptacle between the patient’s legs (if a receptacle is used) | |
| 20. When using a non-coated catheter, put some lubrication on the meatus and then insert the cone of the syringe with (anaesthetic) lubrication in the meatus and slowly instil 6 ml gel into the urethra. Remove the nozzle from the urethra. | Adequate lubrication helps to prevent urethral trauma. Use of a local anaesthetic minimises the discomfort experienced by the patient and can aid success of the procedure. |
| 21. In case of anaesthetic lubrication wait as recommended by the product (3–9 min) | To ensure a maximised anaesthetic effect |
| 22. Separate with one hand the labia and give traction upward with one hand | To obtain a good view of the meatus and to minimise the risk of contamination of the urethra |
| 23. Take the catheter in the hand with the sterile glove. Insert the catheter in the meatus and gently advance the catheter into the urethra until it is in the bladder and urine drains. If no urine flows, gently apply pressure on the symphysis pubis area) until urine drains. | |
| 24. Make sure the urine collection bag is below the level of the bladder | Assist in urine flow |
| 25. When urine flow stops, withdraw the catheter very slowly, in small centimetre steps. If the urine flow starts again during withdrawal, discontinue withdrawal and wait for the flow to stop before resuming catheter withdrawal. | Make sure that the entire bladder is empty |
| 26. Discard the catheter completely | |
| 27. Clean the labia and meatus | To avoid skin irritation |
| 28. Help the patient into a comfortable position. Ensure that the patient’s skin and bed are both dry | If the area is left wet or moist, secondary infection and skin irritation may occur |
| 29. Measure the amount of urine. To be aware of bladder capacity for patients with previous occurrence of urinary retention. | To monitor renal function and fluid balance. It is not necessary to measure the amount of urine if the urinary catheter is routinely changed. |
| 30. Take a urine specimen for laboratory examination, if required | To rule out urinary tract infection |
| 31. Dispose of equipment in a plastic clinical waste bag and seal the bag before moving the trolley | To prevent environmental contamination |
32. Record information in relevant documents; this should include: • patient experience and problems | To provide a point of reference or comparison in the event of later queries |
Appendix D
Male urethral catheterisation by a healthcare professional – Non-touch procedure
Checklist equipment:
- Set with swabs
- Non-touch catheter (types see below)
- Disposable towel
- Disposable pad for bed protection
- One pair of non-sterile gloves
- Sterile water (20 ml) for hydrophilic catheter, if necessary
- Sterile (anaesthetic) lubricating gel (syringe 6 ml) (if the catheter is not pre-lubricated)
- Universal specimen container, if required
- Cleansing solution (water and pH neutral soap)
- Bactericidal alcohol hand disinfection
- A catheter drainage bag or receptacle for urine
- In case of infected and/or immunocompromised patient follow local guidelines
Additionally: - Spare catheter (same type)
- Catheter of a different/smaller size (hydrophilic or pre-lubricated)
For examples of catheters, see Chapter 7
| Action | Rationale |
| 1. Verify the practitioner’s order | To maintain patient safety |
| 2. Confirm the patient’s identity | To maintain patient safety |
| 3. Check the indication and patient file for past problems, allergies etc. | To maintain patient safety |
| 4. Before the procedure, explain the process to the patient | To gain consent and cooperation and to ensure the patient understands the procedure |
| 5. Undertake procedure on the patient’s bed or in clinical treatment area using screens/curtains to promote and maintain privacy and dignity | To ensure patient’s privacy |
| 6. Assist the patient to get into a relaxed supine position of 30° (if possible) with the legs extended to ensure the penis is accessible. Do not expose the patient at this stage of the procedure. | To maintain patient’s dignity and comfort during the procedure |
| 7. Hand hygiene using soap and water/bactericidal alcohol hand rub | To reduce risk of infection |
| 8. Clean and prepare the trolley, placing all equipment required on the bottom shelf | To prevent hospital-acquired infections T op shelf acts as a clean working surface |
| 9. Take the trolley to the patient’s bedside | |
| 10. Make the swabs wet with the cleansing solution | To cleanse the genitals |
11. Prepare the catheter so that it is ready to use. - When using a catheter with a lubricating bag in the package, break the lubricating bag, open the package and hang it beside the patient - When using a hydrophilic ready to use or a pre-lubricated ready-to-use catheter, open the package and hang it beside the patient | To activate the catheter coating To activate the catheter coating |
| 12. Using an aseptic technique, connect the bag to the catheter | To reduce the risk of cross-infection |
| 13. Remove cover that is maintaining the patient’s privacy and position a disposable pad under the patient’s buttocks and thighs | To ensure urine does not leak onto the bed |
| 14. Hand hygiene using soap and water/bactericidal alcohol hand rub | Hands may have become contaminated by handling the outer packs |
| 15. Put on non-sterile gloves | To reduce risk of cross-infection |
| 16. Lift the penis and retract the foreskin (uncircumcised) if present using a gauze swab and clean the glans penis with the solution. Begin with the foreskin, then the glans, and finally the urethral meatus. Use a new swab for each part. Place the drape across the patient’s thighs and under the penis. | To prevent infection |
| 17. Take the catheter with the other hand, holding only the plastic cover or the end of the catheter without touching the catheter | To avoid need for sterile gloves and to prevent infection |
| 18. Insert the catheter in the meatus and gently advance the catheter in the urethra until it is in the bladder and until urine drains (then insert the catheter 2 cm deeper) or until the end of the catheter During insertion, hold the penis upright (90°) with traction | Advancing the catheter ensures that it is correctly positioned in the bladder. To ensure that the catheter is in the bladder. Lifting the penis straightens the penile urethra and facilitates catheterisation |
| 19. If no urine flows gently apply pressure over the symphysis pubis area till urine drains | Makes sure the urine flows |
| 20. Do not use force if there are difficulties inserting the catheter | To prevent injuries of urethra and bladder neck |
| 21. Make sure the urine collection bag is below the level of the bladder | Makes sure the urine flows |
| 22. When urine flow stops, withdraw the catheter very slowly, in centimetre steps. If the urine flow starts again during withdrawal, discontinue withdrawal and wait for the flow to stop before resuming catheter withdrawal | Makes sure that the bladder is empty, and prevents residual urine |
| 23. Discard the catheter completely | |
| 24. Ensure that the glans penis is cleansed after the procedure, and reposition the foreskin if present | Retraction and constriction of the foreskin behind the glans penis resulting in paraphimosis may occur if this is not done |
| 25. Help the patient into a comfortable position. Ensure that the patient’s skin and bed are both dry. | If the area is left wet or moist, secondary infection and skin irritation may occur |
| 26. Measure the amount of urine | To be aware of bladder capacity for patients with previous occurrence of urinary retention. To monitor renal function and fluid balance. |
| 27. Take a urine specimen for laboratory examination, if required | To rule out urinary tract infection |
| 28. Dispose of equipment in a plastic clinical waste bag and seal the bag before moving the trolley | To prevent environmental contamination |
| 29. Maintain hand hygiene according to hospital policy | To reduce risk of infection |
30. Record information in relevant documents; this should include: procedure | To provide a point of reference or comparison in the event of later queries |
Appendix E
Female urethral catheterisation by a healthcare professional – Non-touch procedure
Checklist equipment:
- Set with swabs
- Disposable towel
- Disposable pad for bed protection
- One pair of non-sterile gloves
- Catheters
- Sterile water (20 ml) for hydrophilic catheter, if required
- Sterile (anaesthetic) lubricating gel (syringe 6 ml) (if the catheter is not
pre-lubricated)
Universal specimen container, if required - Cleansing solution (water and pH neutral soap)
- Bactericidal alcohol hand disinfection
- A catheter drainage bag or receptacle for urine
Additionally: - Spare catheter (same type)
- Catheter of a different/smaller size (hydrophilic or pre-lubricated)
For examples of catheters, see Chapter 7.
| Observation | Rationale |
| 1. Confirm the patient’s identity | To maintain patient safety |
| 2. Check the indication and patient file for past problems, allergies etc. | To maintain patient safety |
| 3. Before the procedure, explain the process to the patient | To gain consent and cooperation and to ensure the patient understands the procedure |
| 4. Undertake procedure on the patient’s bed or in clinical treatment area using screens/curtains to promote and maintain privacy and dignity | To ensure patient’s privacy |
| 5. Assist the patient into a relaxed supine position of 30° (if possible). Do not expose the patient at this stage of the procedure. | To maintain patient’s dignity and comfort during the procedure |
| 6. Hand hygiene using soap and water/bactericidal alcohol hand rub according to hospital policy | To reduce risk of infection |
| 7. Clean and prepare the trolley, placing all equipment required on the bottom shelf | The top shelf acts as a clean working surface |
| 8. Take the trolley to the patient’s bedside | |
| 9. Open the set with swabs | To prepare equipment |
| 10. Make the swabs wet with the cleansing solution | To cleanse the genitals |
| 11. If using a hydrophilic catheter that requires hydration, open the package and fill with sterile water (following the manufacturer’s instructions) and hang the packaging beside the patient or trolley and wait the recommended time. To activate the catheter coating. | For smoother and efficient insertion process |
| 12. If using a catheter with a lubricating bag in the package, break the lubricating bag, open the outer package and hang it beside the patient | To activate the catheter coating and lubrication for smoother and efficient insertion process |
| 13. If using a hydrophilic pre-lubricated or ready-to-use catheter, open the package and hang the package beside the patient | |
| 14. Using an aseptic technique, connect the bag to the catheter | To reduce the risk of cross-infection |
| 15. Remove cover that is maintaining the patient’s privacy and position a disposable pad under the patient’s buttocks and thighs | To ensure urine does not leak onto bed |
| 16. Maintain hand hygiene according to hospital policy To reduce risk of infection. Hands may have become contaminated by handling the outer packs. | |
| 17. Put on non-sterile gloves | To reduce risk of cross-infection |
| 18. Spread the legs in a gynaecological position | To obtain a good view of the meatus |
| 19. Separate with one hand the labia and give traction upward | To clean the labia and meatus more easily |
| 20. Clean the labia majora exterior and interior, and then the labia minor exterior and interior, and finally, the urethral meatus. One swab for each labia and meatus – use the wipe anterior to posterior. | To avoid wiping any bacteria from the perineum and anus forward to the urethra |
| 21. Separate with one gloved hand the labia and give traction upward | To obtain a good view of the meatus and to minimise the risk of urethral contamination |
| 22. Take the catheter with the other gloved hand holding only the plastic cover or the end of the catheter without touching the catheter | To maintain sterility of the catheter |
| 23. Insert the catheter in the meatus and gently advance the catheter in the urethra until in the bladder and urine flows out | |
| 24. Make sure the urine collection bag is below the level of the bladder | Assist in urine flow |
| 25. When urine flow stops, apply slight pressure to the bladder until urine flow resumes | Make sure that the entire bladder is empty |
| 26. When urine flow stops, withdraw the catheter very slowly, in centimetre steps. If the urine flow starts again during withdrawal, discontinue withdrawal and wait for the flow to stop before resuming catheter withdrawal. | Make sure that the entire bladder is empty |
| 27. Discard the catheter completely | |
| 28. Clean the labia and meatus | To avoid skin irritation |
| 29. Help the patient into a comfortable position. Ensure that the patient’s skin and bed are both dry. | If the area is left wet or moist, secondary infection and skin irritation may occur |
| 30. Measure the amount of urine | To be aware of bladder capacity for patients with previous occurrence of urinary retention. To monitor renal function and fluid balance. It is not necessary to measure the amount of urine if the urinary catheter is routinely changed. |
| 31. Take a urine specimen for laboratory examination, if required | To rule out urinary tract infection |
| 32. Dispose of equipment in a plastic clinical waste bag and seal the bag before moving the trolley | To prevent environmental contamination |
33. Record information in relevant documents; this should include: • residual volume • reasons for catheterisation • colour and odour of urine • date and time of catheterisation • catheter type and size • problems negotiated during the procedure • review date to assess the need for continued catheterisation or date of change of catheter |
Appendix F
Intermittent urethral dilatation – female and male
The procedure for female and male urethral dilatation is almost the same as for intermittent catheterisation (IC).
Material
Procedure
If healthcare professionals perform the dilatation procedure, they should use an aseptic (non-touch) technique. When patients undertake the procedure at home they should always use a non-touch technique.
Catheter type
Choose a larger Charrière size than for normal catheterisation. Healthcare professionals can advise the patients in choosing the correct Charrière size. A catheter with a flexible rounded or pointed tip could be helpful to dilate the stricture. (see Section 7.3)
| Observation | Management |
| 1. Prepare material for catheterisation | |
| 2. Choose catheter for dilatation as per physician’s orders | |
| 3. The procedure for dilatation is the same as for IC | |
| 4. For dilatation of the stricture, the catheter should be inserted as far as the healthcare professional advises | To ensure that the stricture is passed |
| 5. Gentle pressure may be needed to insert the catheter past the point of narrowing | |
| 6. Advance the catheter until the stricture has been passed | |
| 7. It could be helpful to start with a smaller size of catheter and follow with a larger size in the same dilatation procedure | |
| 8. The further procedure is the same as for IC | |
| 9. Documentation of the dilatation procedure | To provide a point of reference or comparison in the event of later queries |
Appendix G
Patient/caregiver teaching procedure for intermittent self-catheterisation – female and male
The procedure for female and male intermittent self-catheterisation (ISC) has the same principles with a few changes when compared to intermittent catheterisation by healthcare professionals.
Procedure
When patients perform ISC themselves, non-touch techniques are preferred. When non-touch techniques are not feasible, clean techniques should be used.
Catheter type
Healthcare professionals can advise an appropriate catheter and Charrière, depending on the situation (see Sections 9.1 and 9.2).
| Action | Rationale |
| 1. Prepare the patient for ISC using visual aids and written information booklet | Booklet/DVD. Website-available for view at home. Use of model demonstration for hand/finger placement. |
| 2. Obtain written or verbal consent depending on local guidelines. Document consent in notes. | |
| 3. Explain rational for ISC to patient. Allow time for patient to process information. | |
| 4. Check patient’s knowledge of ISC, manual dexterity, mobility and cognitive status. Verify consent to proceed with ISC. | To ensure that the stricture is passed |
| 5. Check patient’s capability to perform ISC | Are there special devices needed? |
| 6. Check patient’s motivation in performing ISC. If possible, give time to patient to process information given. | If motivation is insufficient, try to motivate the patient before instruction begins |
| 7. Choose the appropriate catheter with the patient | |
| 8. Choose non-touch or clean method for ISC in consultation with patient | |
| 9. Choose, together with patient, most appropriate place to perform ISC | Bed, bathroom, toilet or wheelchair |
| 10. Verbal explanation of insertion procedure. Allow the patient to practice on the models. | Use chosen technique, non-touch or clean. Use models to assist with this demonstration. |
| 11. Educate patient regarding hand hygiene, which should be performed before and after ISC. Alcohol gel can be used if no visible dirt/soilage. | |
| 12. Explain and practise cleansing of the genitals. Males: retract foreskin in uncircumcised men and clean head of penis. Females: One wipe one way. Wipe front to back. | |
| 13. Healthcare professional should perform first intermittent catheter insertion to ensure procedure is possible. However, there are occasions when the patient may wish to do procedure him/herself, such as conversion from indwelling catheterisation to ISC. Decide together with patient whether the first attempt will be done by the healthcare professional or by the patient. | |
| 14. If desired, perform the insertion procedure for the patient | As life example for patient |
15. Patient performs the insertion procedure by him/herself, supported by verbal instruction 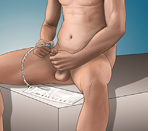 Fig. 19a Insertion of the catheter by a male patient Female: 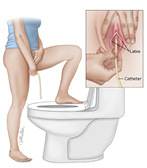 Fig. 19b Insertion of the catheter by a female patient
| Patient uses the chosen, non-touch or clean technique. |
| 16. Remove catheter when the bladder is completely empty. Advise the patient to withdraw the catheter very slowly once no urine drainage is noted. When urine is noted stop and allow urine to drain. | Explain to patient that they should normally wait until bladder is completely empty |
| 17. Demonstrate disposal of catheter and drainage of urine bag should catheter set be used Demonstrate to patient how to note and record urine volume | Discuss relevance of fluid intake and how it affects urine output |
| 18. Wash hands | |
| 19. Wait short time to recuperate the urethra and to refill the bladder. If possible, allow patient to have time to process information. | Time between practice depends on patient’s experience with the procedure. Perhaps let patient have food and drink to let them process information. |
| 20. Assess patient’s understanding by asking them to verbalise ISC procedure | Assess the patient’s knowledge before performing insertion procedure him/herself. |
| 21. In hospital setting, observe patient doing procedure | Change insertion position if necessary |
| 22. Check if patient feels comfortable with the procedure. Answer questions. | Change position or material if desired |
| 23. Check if patient feels at ease with the ISC procedure and can perform it on their own | If not, establish the reason and try to solve the problem |
| 24. Give patient catheters until first evaluation. Order or give prescription to patient to order supply | After evaluation the type of catheter sometimes needs to be changed |
| 25. Inform patient regarding storage of catheters | |
| 26. Give further information about frequency, availability, difficulties/troubleshooting, etc. which may occur (see Appendix A). | Appendix A can be used to check that all relevant information has been given and it can also be used to check patient’s knowledge. |
| 27. Document the teaching procedure/ISC session in notes as per local guidelines | To provide a point of reference or comparison in the event of later queries |
| 28. Give voiding diary to patient. See Appendix I. Explain to patient how to complete bladder diary. | To visualise the progress of ISC at home. Bladder diary apps available via App stores should patient prefer. |
| 29. Make appointment for follow-up. Give contact details for healthcare specialist/team. |

Appendix H
Help devices
Due to a new European medical device regulation many help devices are no longer available. Still available are:
Mirrors for females
There are mirrors that are designed to fix to the leg to enable the optimum use and view, while leaving both hands free for catheter insertion.
The use of a mirror may also complicate catheterisation (they need to be carried, the view is reversed, and manual dexterity may be limited); therefore, patients are often encouraged to learn to catheterise without them. Some available types:
- Leg mirrors – often fixed to the leg with Velcro
- Mirrors designed to use in bed
- A cushion with a mirror – also may be helpful in case of spasticity.
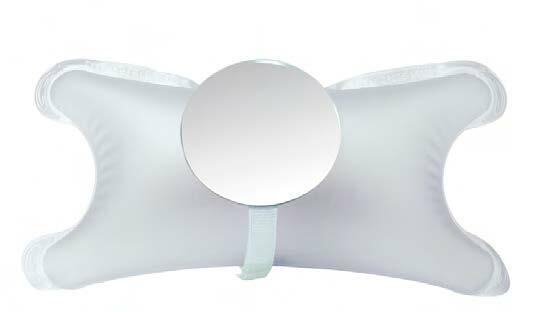
Fig. 20 Cushion with mirror
(Courtesy of Manfred Sauer GmbH)
Freehand clothing holder
The Freehand clothing holder enables catheter users to manage clothing in a discrete manner and leave both hands free for catheterisation.

Fig. 21a and 21b
Freehand clothing holder
(Available: www.rolli-world.de/inkontinenz/inko-zubehoer/freehand-hosenhalter/#)
(Courtesy of V. Geng/Manfred Sauer GmbH)
Uribag
The Uribag is a small urinal that enables people to catheterise if there is no toilet available. Available for males and females.
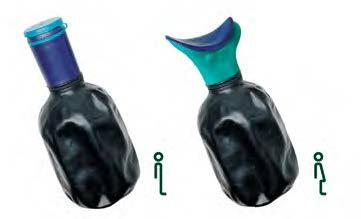
Fig. 22 Uribag®
(Courtesy of Uribag.com)
KIC-System® = K(c)ondom and intermittent catheterisation
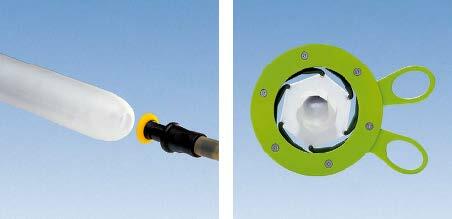
Fig. 23a and 23b KIC-System®
(Courtesy of Manfred Sauer GmbH)
The KIC-System® has a removable connector instead of a fixed tube to connect the leg bag. This connector can be removed from the urinary condom and, using the special condom expander tool, the condom can then be pulled over the penis shaft so that the penis tip is left free for disinfecting and catheterisation. Afterwards, the urinary condom can be restored to its original position and connected to the existing drainage system. This procedure can be repeated several times.
With the KIC-System®, only one urinary condom per day is needed – this protects the skin, but it is also more economic.
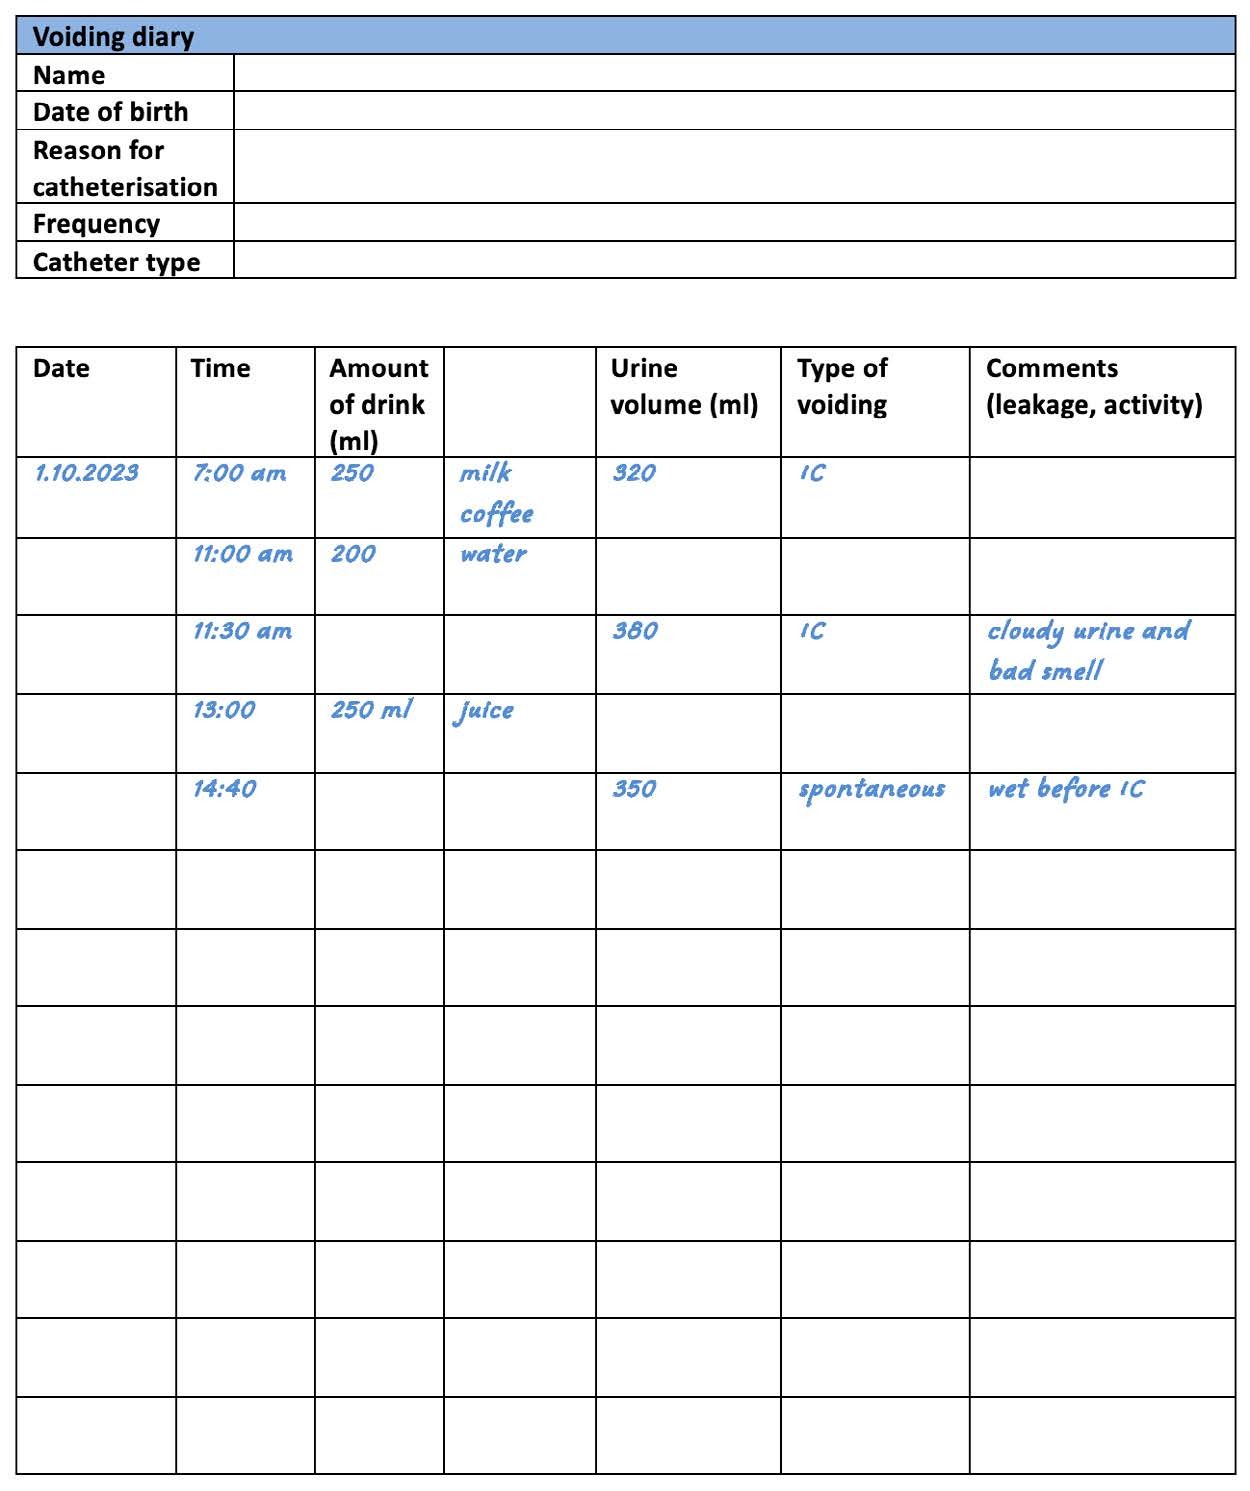
Appendix I
Voiding diary
Also known as bladder diary, input/output protocol/chart or record or frequency-volume chart
Instructions
- Complete the diary over the agreed time (may be 3 days or longer)
- Comments are additional information for the health care practitioner
Appendix J
Changes in urine due to food and medication
Urine consists mostly of water (about 95%). However, the remaining contents can vary depending on what someone has eaten, drunk, breathed, or been exposed to. The changes in urine colour for these reasons do not differ between catheterised and non-catheterised people. Normal urine is clear, straw-coloured, with almost no odour. [206]
Table 13. Possible colour and odour changes in urine caused by medication, food or drink
| Colour | Food causes | Drug causes | Diseases | |
|---|---|---|---|---|
| Transparent clear | Well hydrated | |||
| Yellow to amber | Slight dehydration | |||
| Yellow -cloudy | Bacterial infection/UTI Kidney stones Excessive cellular material Proteinuria | |||
| Yellow | Carrot, Cascara, Vitamin B & C | Phenothiazines Warfarin Uropyrine Danthron | Concentrated urine Diabetes Gallbladder disease Liver disease Hypothyroidism Infection Dehydration due to increased concentration of urochrome | |
| Yellow-orange to red to brown | Senna Rifampicin Chloroquine Anthraquinones (in alkaline urine) | |||
| Red or pink | Beets Blackberries Rhubarb | Phenytoin Rifampin Uprofen Ibuprofen Levodopa Chlorpromazine Thioridazine Propofol | Haematuria (haemoglobin, myoglobin) | |
| Pink / Pink-brown | Fava beans | Nitrofurantoin Phenothiazines Levodopa Metronidazole | Bile pigment Myoglobin | |
| Brownish-black | Cascara Senna Aloe | Bile pigment melanin Methaemoglobin Proteus spp. UTI Liver disorders | ||
| Green or blue | Asparagus (offensive smell) | Sulphonamides Amitriptyline Indomethacin Cimetidine Promethazine Triamterene Sildenafil Methylene Blue | Pseudomonas spp. UTI Tryptophan malabsorption | |
| Darkens on standing (red-black) | Methyldopa Metronidazole Levodopa Imipenem–cilastatin | |||
From Simerville 2005 [207], Panesar 2009 [208]
Appendix K
Medical travel document for patients
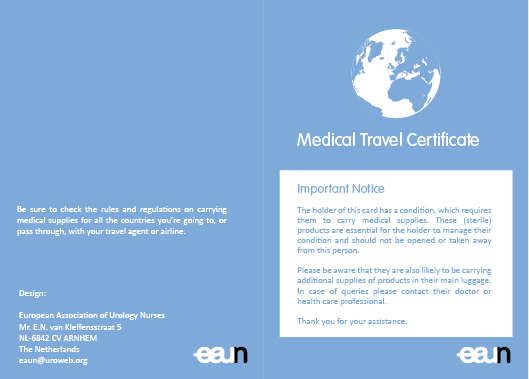
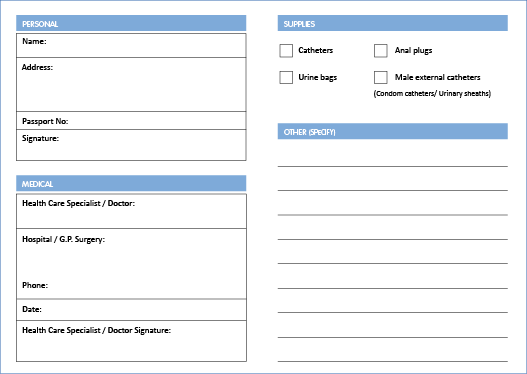
The picture above is an example of a Medical travel certificate (front).
On the back, the “Important notice” text is printed in Danish, Dutch, French, German, Greek, Italian, Portuguese and Spanish.
A PDF of the document can be downloaded here.
Appendix L
Questionnaires/tools for evaluating intermittent catheterisation/intermittent self-catheterisation
In recent years, several tools have been developed to assess satisfaction, acceptance, adherence and quality of life (QoL) related to intermittent catheterisation (IC).
For nurses and therapists, the feasibility questionnaire as well as urinary tract infection (UTI) assessment tool can be used to include the patients’ perspective to improve the quality of UTI management.
InCaSaQ – Intermittent Catheterisation Satisfaction Questionnaire
To evaluate the satisfaction of patients with the urinary catheter that is provided.
Reference: Validation of the InCaSaQ, a new tool for the evaluation of patient satisfaction with clean intermittent self-catheterization. A Guinet-Lacoste, M Jousse, D Verollet, S Sheikh Ismael, F Le Breton, E Tan , G Amarenco. Ann Phys Rehabil Med 2014 Apr;57(3):159–68.
doi: 10.1016/j.rehab.2014.02.007.
https://www.sciencedirect.com/science/article/pii/S1877065714000414
I-CAT – Intermittent Catheterisation Acceptance Test
Assessing the acceptance of clean intermittent self-catheterisation (CISC) in a neurological and non-neurological population with indications for self-catheterisation.
Reference: Intermittent catheterization acceptance test (I-CAT): A tool to evaluate the global acceptance to practice clean intermittent self-catheterization. Amandine Guinet-Lacoste, Jacques Kerdraon, Alexandra Rousseau, Philippe Gallien, et al. Neurourology and Urodynamics; Volume36, Issue 7 September 2017; 1846-1854. https://doi.org/10.1002/nau.23195
https://onlinelibrary.wiley.com/doi/10.1002/nau.23195
ISC-Q – Intermittent Self-Catheterisation Questionnaire
Patient-reported outcome measure that evaluates QoL for patients performing ISC.
Reference: Development and Psychometric Validation of the Intermittent Self-Catheterization Questionnaire. Binder P., Lloyd A.L., Elwick H., Denys P., et al. Clinical Therapeutics Col. 23 Iss.12 December 2012 p. 2302-2313.
https://pubmed.ncbi.nlm.nih.gov/23178033/
ICAS – Intermittent Catheterisation Adherence Scale
The ICAS is an evaluation scale that is simple, acceptable, valid and reproducible, and in some cases, it may facilitate the medical follow-up of ISC patients.
Reference: ICAS - Intermittent catheterisation adherence scale. Amandine Guinet-Lacoste, Audrey Charlanes, Camille Chesnel, Emilie Blouet, et al.
https://doi.org/10.1002/nau.23746
ICDQ – Intermittent Catheterisation Difficulty Questionnaire
A tool for the evaluation of patient difficulties with clean intermittent self-catheterisation (CISC).
Amandine Guinet-Lacoste, Marylène Jousse, Eliane Tan, Murielle Caillebot, et al. https://onlinelibrary.wiley.com/doi/10.1002/nau.22686
USQNB-IC – Urinary Symptom Questionnaire for individuals with Neuropathic Bladder using Intermittent Catheterisation
This instrument originates from and has an emphasis on the lived experiences of patients with neurogenic bladder who use intermittent catheterisation (IC).
Reference: Preliminary validation of a Urinary Symptom Questionnaire for individuals with Neuropathic Bladder using Intermittent Catheterization (USQNB-IC): A patient-centered patient reported outcome. Tractenberg RE, Groah SL, Rounds AK, Ljungberg IH, Schladen MM (2018) PLoS ONE 13(7): e0197568.
https://journals.plos.org/plosone/article?id=10.1371/journal.pone.0197568
Qualiveen
The 30-item Qualiveen is a specific health-related quality of life questionnaire for urinary disorders in patients with neurological conditions, such as multiple sclerosis and spinal cord injury.
Reference: Bonniaud V, Bryant D, Parratte B, Guyatt G. Development and validation of the short form of a urinary quality of life questionnaire: SF-Qualiveen. J Urol. 2008 Dec;180(6):2592-8.
Epub 2008 Oct 31. PMID: 18950816. https://doi.org/10.1016/j.juro.2008.08.016
TPE-ISC – Therapeutic Patient Education in Intermittent Self-Catheterisation Programme
A programme to ensure the correct technique for ISC.
Reference: Assessment of the feasibility of intermittent self-catheterisation among patients with neurogenic bladder. British Journal of Neuroscience Nursing Vol. 19, No. 2. Balhi, S. published online 3 May 2023 https://doi.org/10.12968/bjnn.2023.19.2.61
https://www.magonlinelibrary.com/doi/abs/10.12968/bjnn.2023.19.2.61
UTI assessment tool for intermittent catheter users: a way to include user perspectives and enhance quality of UTI management
Assessment tool for UTI, not validated. Intended to be used by nurses together with patients.
Reference: Lauridsen SV, Averbeck MA, Krassioukov A, Vaabengaard R, Athanasiadou S. UTI assessment tool for intermittent catheter users: a way to include user perspectives and enhance quality of UTI management. BMC Nurs. 2022;21(1):272. Published 2022 Oct 6. doi:10.1186/s12912-022-01033-7.